Showing posts with label Oracle SOA 12c. Show all posts

Wednesday, October 2, 2024

Maven script to deploy MDS (Metadata Services) artifacts in a SOA 12.2.1.4

To create a Maven script to deploy MDS (Metadata Services) artifacts in a SOA 12.2.1.4 environment, you need to use the oracle-maven-sync configuration and Oracle's oracle-maven-plugin to manage the deployment. Below is a sample pom.xml setup and a script to achieve this.

Click here for the above step which is a prerequisite

Prerequisites

  1. Make sure the Oracle SOA 12.2.1.4 Maven plugin is installed in your local repository or is accessible through a corporate repository.
  2. Your environment should have Oracle WebLogic and SOA Suite 12.2.1.4 configured properly.
  3. Oracle MDS repository should be set up and accessible.

Maven pom.xml Configuration

Here’s a sample pom.xml file for deploying an MDS artifact using Maven:

xml
<project xmlns="http://maven.apache.org/POM/4.0.0" xmlns:xsi="http://www.w3.org/2001/XMLSchema-instance" xsi:schemaLocation="http://maven.apache.org/POM/4.0.0 http://maven.apache.org/maven-v4_0_0.xsd"> <modelVersion>4.0.0</modelVersion> <groupId>com.example</groupId> <artifactId>soa-mds-deployment</artifactId> <version>1.0-SNAPSHOT</version> <packaging>pom</packaging> <properties> <!-- Update with your SOA and WebLogic version --> <oracle.soa.version>12.2.1.4</oracle.soa.version> <maven.compiler.source>1.8</maven.compiler.source> <maven.compiler.target>1.8</maven.compiler.target> </properties> <dependencies> <dependency> <groupId>oracle.soa.common</groupId> <artifactId>oracle-soa-maven-plugin</artifactId> <version>${oracle.soa.version}</version> </dependency> </dependencies> <build> <plugins> <plugin> <groupId>oracle.soa.common</groupId> <artifactId>oracle-soa-maven-plugin</artifactId> <version>${oracle.soa.version}</version> <configuration> <!-- Configuration for the SOA MDS deployment --> <action>deploy</action> <repositoryName>mds-soa</repositoryName> <sourcePath>src/main/resources/mds/</sourcePath> <serverURL>t3://<admin-server-host>:<admin-server-port></serverURL> <username>weblogic</username> <password>your_weblogic_password</password> <partition>soa-infra</partition> </configuration> </plugin> </plugins> </build> <profiles> <profile> <id>soa-mds-deploy</id> <build> <plugins> <plugin> <groupId>oracle.soa.common</groupId> <artifactId>oracle-soa-maven-plugin</artifactId> <executions> <execution> <goals> <goal>deploy</goal> </goals> </execution> </executions> <configuration> <!-- MDS repository configuration --> <repositoryName>mds-soa</repositoryName> <serverURL>t3://<admin-server-host>:<admin-server-port></serverURL> <username>weblogic</username> <password>your_weblogic_password</password> <partition>soa-infra</partition> <sourcePath>src/main/resources/mds/</sourcePath> </configuration> </plugin> </plugins> </build> </profile> </profiles> </project>

Folder Structure

Ensure your project directory is structured like this:

css
. ├── pom.xml └── src └── main └── resources └── mds └── your_mds_artifacts

Place your MDS artifacts (e.g., .xml or .wsdl files) in the src/main/resources/mds/ folder.

Maven Command

To deploy the MDS artifacts, use the following command:

bash
mvn clean install -Psoa-mds-deploy

Key Points

  1. repositoryName: The MDS repository name (mds-soa) should match the target repository configured in your SOA environment.
  2. serverURL: Replace <admin-server-host> and <admin-server-port> with your WebLogic Admin server’s host and port.
  3. username/password: Use the WebLogic Admin credentials to authenticate the deployment.
  4. sourcePath: Specify the folder containing your MDS artifacts.

This script configures a Maven build to deploy MDS artifacts to your SOA 12.2.1.4 environment. If you encounter specific errors during deployment, check the logs on the Admin server to ensure correct configurations.

Installation of Oracle SOA 12.2.1.4 Maven plugin

 To install the Oracle SOA 12.2.1.4 Maven plugin, follow the steps below. The Oracle SOA Maven plugin is not hosted in a public repository like Maven Central, so it needs to be installed manually from the Oracle installation directory or configured in a local repository.

Step 1: Locate the Oracle SOA Maven Plugin

The Oracle SOA Suite installation directory contains a script that generates a pom.xml file and installs the necessary SOA Maven artifacts into your local Maven repository. This is usually found in your Oracle Middleware home directory.

The typical path to the Maven sync script is:

ruby

<ORACLE_HOME>/oracle_common/plugins/maven/com/oracle/maven/oracle-maven-sync.jar

For Example on my Server this file is located in following directory


C:\Oracle\Middleware\Oracle_Home\oracle_common\plugins\maven\com\oracle\maven\oracle-maven-sync\12.2.1

Step 2: Execute the oracle-maven-sync Script

  1. Open a terminal or command prompt.

  2. Navigate to the directory containing oracle-maven-sync.jar.

    bash
    cd C:\Oracle\Middleware\Oracle_Home\oracle_common\plugins\maven\com\oracle\maven\oracle-maven-sync\12.2.1
  3. Run the Maven sync command to install the SOA Maven plugin and dependencies:

    bash
    mvn install:install-file -DpomFile=oracle-maven-sync.xml -Dfile=oracle-maven-sync.jar

    Alternatively, you can use the oracle-maven-sync script:

    bash
    java -jar oracle-maven-sync.jar -f

This command installs all the necessary SOA artifacts, including the oracle-soa-maven-plugin into your local Maven repository (~/.m2).

Step 3: Verify Installation

After running the command, verify that the artifacts have been installed in your local Maven repository. Check under the com/oracle/soa/oracle-soa-maven-plugin directory inside the .m2 folder:

ruby
~/.m2/repository/com/oracle/soa/oracle-soa-maven-plugin

You should see subdirectories like 12.2.1.4, containing the plugin JAR files and associated pom.xml files.

Step 4: Update the Maven pom.xml

Once the plugin is installed locally, update your pom.xml to reference it:

xml

<plugin> <groupId>com.oracle.soa</groupId> <artifactId>oracle-soa-maven-plugin</artifactId> <version>12.2.1.4</version> </plugin>

Additional Configuration (Optional)

If you need to use this plugin in a shared environment (e.g., CI/CD pipeline or team development), consider deploying it to a shared Maven repository like Nexus or Artifactory. Here’s how to do that:

  1. Install the plugin to your shared repository:

    bash
    mvn deploy:deploy-file -DgroupId=com.oracle.soa \ -DartifactId=oracle-soa-maven-plugin \ -Dversion=12.2.1.4 \ -Dpackaging=jar \ -Dfile=<ORACLE_HOME>/soa/plugins/maven/oracle-soa-maven-plugin-12.2.1.4.jar \ -DpomFile=<ORACLE_HOME>/soa/plugins/maven/oracle-soa-maven-plugin-12.2.1.4.pom \ -DrepositoryId=<repository_id> \ -Durl=<repository_url>
  2. Configure your pom.xml to point to the shared repository:

xml

<repositories> <repository> <id>shared-repo</id> <url>http://<repository_url>/repository/maven-public/</url> </repository> </repositories>

Wednesday, March 6, 2019

Oracle SOA 12c: How To Create READ-ONLY Access To The JMS Messages For Monitor User

Create a user who only can view the JMS Messages and can not create,  delete,  move or import JMS Messages, and can not monitor other resources.

The following are the steps to allow Non Admin role users to monitor JMS resources:

1. In the left pane, select Security Realm.
2. Select <your_realm_name>.
3. In "Configuration" tab, check "Use Authorization Providers to Protect JMX Access", click save and then activate changes.
4. Restart the server.
5. In the left pane, select Security Realm.
6. Select <your_realm_name>.
7. Go to "Users and Groups".
8. In users, create a new user (such as say "jmsmonitor")
9. Adding it to group "Monitors":
    a. Select <your_realm_name>.
    b. Select "Users and Groups".
    c. Click on user name, in right pane select "Groups".
    d. From Parent Groups, select monitors, click arrow pointing right side.
10. Go to "Roles and Policies" - > Realm Policies
11. In Policy table, select "JMX Policy Editor".
12. Select "Global Scope", click next.
13. From MBean Types, select "weblogic.management.runtime"
14. Select "JMSDestinationRuntimeMBean", click next.
15. In Attributes and Operations, expand "Operations: Permission to Invoke".
16. Select "getCursorEndPosition" operation.
17. Click on "Create Policy" button
18. Click on "Add Condition", Select "User" in "Predicate List", click next, type User Argument Name (jmsmonitor), say add. Click "Finish"
19. Click on "Add Condition", Select Role in "Predicate List", click next, type Role Argument Name (Admin), say add. Click "Finish"
20. Select "Or" between Role:Admin and User:jmsmonitor and Click "Save"
21. Repeat step 10~19 for set the following operations.
    a. getCursorSize
    b. getCursorStartPosition
    c. getItems
    d. getMessage
    e. getMessages
    f. getNext
    g. getPrevious 
    h. sort

22 - Logout weblogic user and login with the new user.
23 - Go to the created module and click on the created queue
24 - Click on Monitoring tab
25 - Click on the check box associated to the queue and them Show Message button

Wednesday, September 19, 2018

Oracle SOA Stack 12.2.1.3

SOA Suite 12c has a new  component: Oracle Enterprise Scheduler Service (ESS). ESS provides the ability to run different job types distributed across the nodes in an Oracle WebLogic Server cluster. Oracle Enterprise Scheduler runs these jobs securely, with high availability and scalability, with load balancing and provides monitoring and management through Fusion Middleware Control. ESS was available as part of the Fusion Applications product offering. Now it is available in SOA Suite 12c. In this blog, I will demonstrate how to use a new Oracle extension, “Schedule Job”, in JDeveloper 12c to submit an ESS job request from a BPEL process.


Set up a scheduled job in Enterprise Scheduler Service

  • Create a SOA composite with a simple synchronous BPEL process, HelloFromMindTelligent.
  • Deploy HelloFromMindTelligent to SOA using Enterprise Manager.

  • Logon to Fusion Middleware Enterprise Manager.
  • Go to Scheduling Services -> ESSAPP -> Job Metadata -> Job Definitions. This takes you to the Job Definitions page.


  • Click the “Create” button, this takes you to Create Job Definition page. Enter:
Name: HelloFromMindTelligentJob
Display Name: HelloFromMindTelligentJob
Description: HelloFromMindTelligentJob
Job Type: SyncWebserviceJobType


  • Select  Web service


Secure the Oracle Enterprise Scheduler Web Service

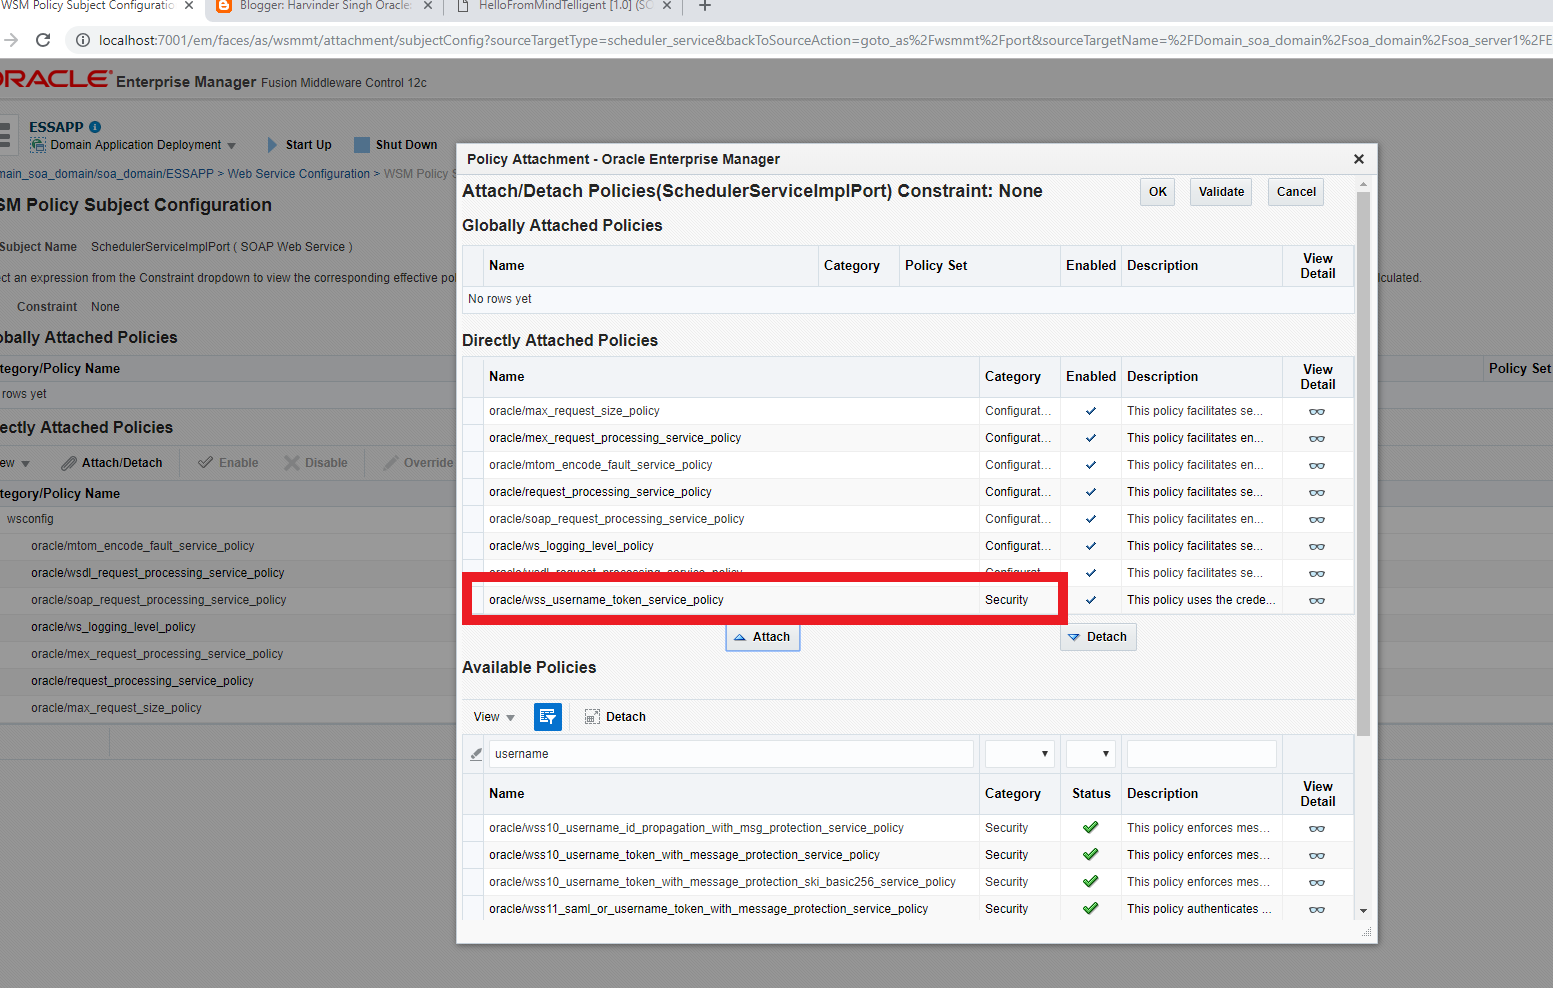
The ESS job cannot be run as an anonymous user, you need to attach a WSM security policy to the ESS Web Service:
  • In Fusion Middleware Enterprise Manager, go to Scheduling Services -> ESSAPP, right click, select “Web Services”.


  • In Web Service Details, click on the link “ScheduleServiceImplPort”.


  • Open tab “WSM Policies” and click on “Attach/Detach”.


  • In “Available Policies”, select “oracle/wss_username_token_service_policy”, click “Attach” button to attach the policy and then click on “Ok” to finish the policy attachment.


  • You should see the policy attached and enabled.


Create a SOA Composite to Submit a HelloFromHarvinderJOB


  • Create a new SOA Application/Project with an asynchronous BPEL (2.0) process, InvokeSchedulerJobMindTelligent, in JDeveloper 12c.
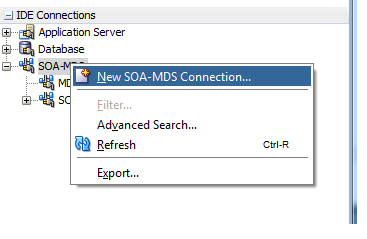
  •  Create a SOA_MDS connection.


  • In the BPEL process, add Schedule Job Activity.
  • Open Schedule Job Activity
  • Double click on Schedule Job Activity


  • Choose HelloFromMindtelligentJob
  • Set Start Time as current date time, and click OK.


  • You may see this pop up message.


  • Click “Yes” to continue. In the next several steps we will replace WSDL URL with concrete binding on the reference binding later to fix this.
  • In EM, go to Scheduling Services -> Web Services.


  • Click on link “SchedulerServiceImplPort”


  • Click on link “WSDL Document SchedulerServiceImplPort”.


  • It launches a new browser window displaying the ESSWebService wsdl. WSDL URL is in the browser address.


  • Update EssService WSDL URL.


  •  You need to attach WSM security policy to EssService request.


  • Add Security Policy: oracle/wss_username_token_client_policy.


  • Setting up the credential store for policy framework is beyond the scope of this blog. However, please ensure that CSF Map with valid credentials is attached. 

  • After the composite is deployed, run the composite and check the Flow. A JOB ID is created
<requestId xmlns:xsi="http://www.w3.org/2001/XMLSchema-instance" xmlns:xsd="http://www.w3.org/2001/XMLSchema" xsi:type="xsd:long">

606
</requestId>


  •  Go ESSAPP -> Job Requests -> Search Job Requests. Find Job 606. Job was executed successfully.


  • Click on the JOB Link


Summary

In this blog, we demonstrated how to set up a SOA web service ESS job and how to invoke ESS web service to submit a job request from BPEL process in SOA Suite 12c 12.2.1.3


SOA 12c 12.2.1.3. Send Error Notifications.


You can create error notification rules at the SOA Infrastructure or individual partition
level that cause an alert message to be triggered when specific fault criteria are met.

For example, you can create a rule that sends an alert if more than 10 errors occur in a
48 hour period.

The error notification rules provide the following benefits:

• An aggregated notification of faults occurring in the system.

• A scheduled-based notification system with a configurable re-occurrence interval. For example, send an alert every 24 hours if rule criteria are met.

• Rule-configured faults and notification channel specifications. When a fault policy is triggered, an email is sent. You can create fault notification rules at the following levels:

• SOA Infrastructure (for system-wide alerts) • Individual partition level (for alerts specific to that partition)

To create a Error Notification Rule, first create a scheduler


  • Login to Enterprise Manager , go to SOA-Infra, Right Click, Define Schedules


  • This will navigate to Schedules Page


  • Click on Create


  • Enter the name , display name ,package, Description, Frequency,Timezone, Start Date and click on OK.  Only /oracle/apps/ess/custom/soa package can be used to create SOA Error Notification Rules

  • This concludes Defining a Schedule. The next step is to create Error Notification Rules
  •  Navigate to  SOA-Infra and click on “Error Notification Rules”,


  • Click Create to create notification rule.


Oracle SOA 12c. 12.2.1.3. Auto Purge


Auto Purge


Auto Purge can be used to free up the database from the older data associated with flow instances, adapter reports and fault alerts.

·         Navigate to the SOA Infrastructure Menu and Right Click

·         Navigate to SOA Administration and then Auto Purge
·         


  •  Click on Auto Purge:-


  • ·         Click on Enable and then enter the Schedule for the job


  • ·         Click on Apply.


How IdP Groups Are Tied to Databricks Groups (Unity Catalog)

  🔗 How IdP Groups Are Tied to Databricks Groups (Unity Catalog) 🔑 Key Principle (Read This First) Databricks does NOT “map” IdP groups...