Tuesday, February 2, 2021

Deployment of SpringBoot Services on AWS Elastic Container Services: Part 2 Create AWS ECS (Amazon Elastic Container Services) Cluster with Cloud Formation Template provided.

 Deployment of SpringBoot Services on AWS Elastic Container Services:  Part 2 Create AWS ECS (Amazon Elastic Container Services) Cluster with Cloud Formation Template provided.


To deploy the Docker Images, please refer to this link, Part 1 of this thread


Create an Amazon ECS cluster deployed behind an Application Load Balancer.

  1. Navigate to the AWS CloudFormation console.
  2. Select Create stack.
  3. Select Upload a template file and choose the ecs.yml 
  4. For the stack name, enter BreakTheMonolith-Demo. Verify that the other parameters have the following values:
    1. Desired Capacity = 2
    2. InstanceType = t2.micro
    3. MaxSize = 2
  5. Select Next.
  6. On the Configure stack options page, keep the default options and scroll down and select Next.


Ensure the cluster is running


  • Select the ECS Instances tab to verify there are two Amazon EC2 instances created by the AWS CloudFormation template.
     

Monday, February 1, 2021

Deployment of SpringBoot Services on AWS Elastic Container Services: Part 1 AWS ECR (Amazon Elastic Container Registry (ECR)

Deployment of SpringBoot Services on AWS Elastic Container Services:  Part 1 AWS ECR (Amazon Elastic Container Registry (ECR) 

Amazon Elastic Container Registry (ECR) is a fully managed container registry that makes it easy to store, manage, share, and deploy your container images and artifacts anywhere. Amazon ECR eliminates the need to operate your own container repositories or worry about scaling the underlying infrastructure. Amazon ECR hosts your images in a highly available and high-performance architecture, allowing you to reliably deploy images for your container applications.


This thread, Part 1 discusses the provisioning of AWS ECR:

Create the repository:

  • Navigate to the Amazon ECR console.
  • On the Repositories page, select Create Repository.
  • On the Create repository page, enter the following name for your repository: api.
    ⚐ Note: Under Tag immutability, leave the default settings.
  • Select Create repository.


After the repository is created, you receive a confirmation message and the repository address is listed under URI. The repository address is in the following format: [account-ID].dkr.ecr.[region].amazonaws.com/[repo-name]. The [account-ID], [region], and [repo-name] will be specific to your setup.


ECR


Build and Push Docker Image to ECR

Using AWS Client Login, Log into the repository.

Use the terminal to authenticate Docker log in:

  1. Run one of the following commands, depending on which version of AWS CLI you have (To identify the version, run aws --version. If needed, configure your credentials.):
    • If you have AWS CLI version 1.x, then run:
      $(aws ecr get-login --no-include-email --region [your-region])
      Replace [your-region], for example: $(aws ecr get-login --no-include-email --region us-west-2)
    • If you have AWS CLI version 2.x, then run:
      aws ecr get-login-password --region [your-region] | docker login --username AWS --password-stdin [your-AWS-account-ID].dkr.ecr.[your-region].amazonaws.com
      Replace [your-region] and [your-AWS-account-ID], for example: aws ecr get-login-password --region us-west-2 | docker login --username AWS --password-stdin 123456789012.dkr.ecr.us-west-2.amazonaws.com
      If authentication is successful, you will receive the confirmation message: Login Succeeded.


  • To build the image, run the following command in the terminal: 
docker build -t api .


  • After the build completes, tag the image so you can push it to the repository: 

docker tag api:latest [account-ID].dkr.ecr.[region].amazonaws.com/api:v1 


  • Push the image to Amazon ECR by running: 

docker push [account-id].dkr.ecr.[region].amazonaws.com/api:v1


If you navigate to your Amazon ECR repository, you should see your image tagged v1.


Friday, January 1, 2021

Anypoint Studio 7.7 to Connect Mule Runtime Time Environment

 Anypoint Studio 7.7  to Connect Mule Runtime Time Environment

This thread discuss on steps to connect Anypoint Platform to Mule Run Time Environment / Exchange to use the RAML artifacts deployed.

  • Click on Windows
  • Click On Preferences
  • Click on Anypoint Studio
  • Click on Authentication


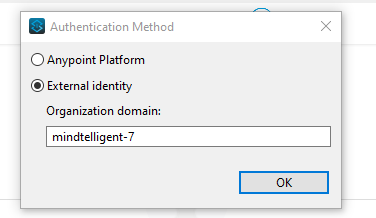
Click on Add and Add and add Authentication Method:


Click OK and enter Authentication Information


Thursday, December 31, 2020

AWS CDK (Python) Create Step Functions for Orchestrating Lambda and Glue Tasks

 AWS Step Functions is a serverless function orchestrator that makes it easy to sequence AWS Lambda functions and multiple AWS services into business-critical applications. Through its visual interface, you can create and run a series of checkpointed and event-driven workflows that maintain the application state. The output of one step acts as an input to the next. Each step in your application executes in order, as defined by your business logic.

Orchestrating a series of individual serverless applications, managing retries, and debugging failures can be challenging. As your distributed applications become more complex, the complexity of managing them also grows. Step Functions automatically manages error handling, retry logic, and state. With its built-in operational controls, Step Functions manages sequencing, error handling, retry logic, and state, removing a significant operational burden from your team.


Setup

The cdk.json file tells the CDK Toolkit how to execute your app.

This project is set up like a standard Python project. The initialization process also creates a virtualenv within this project, stored under the .env directory. To create the virtualenv it assumes that there is a python3 (or python for Windows) executable in your path with access to the venv package. If for any reason the automatic creation of the virtualenv fails, you can create the virtualenv manually.

To manually create a virtualenv on MacOS and Linux:

$ python3 -m venv .env

After the init process completes and the virtualenv is created, you can use the following step to activate your virtualenv.

$ source .env/bin/activate

If you are a Windows platform, you would activate the virtualenv like this:

% .env\Scripts\activate.bat

Once the virtualenv is activated, you can install the required dependencies.

$ 

At this point you can now synthesize the CloudFormation template for this code.

$ cdk synth

To add additional dependencies, for example other CDK libraries, just add them to your setup.py file and rerun the pip install -r requirements.txt command.

This thread helps to create an AWS Step Functions StateMachine with the Python language bindings for CDK.


app.py

from aws_cdk import (
    aws_stepfunctions as sfn,
    aws_stepfunctions_tasks as sfn_tasks,
    core,
)


class JobPollerStack(core.Stack):
    def __init__(self, app: core.App, id: str, **kwargs) -> None:
        super().__init__(app, id, **kwargs)

        submit_job_activity = sfn.Activity(
            self, "SubmitJob"
        )
        check_job_activity = sfn.Activity(
            self, "CheckJob"
        )
        do_mapping_activity1 = sfn.Activity(
            self, "MapJOb1"
        )
        do_mapping_activity2 = sfn.Activity(
            self, "MapJOb2"
        )

        submit_job = sfn.Task(
            self, "Submit Job",
            task=sfn_tasks.InvokeActivity(submit_job_activity),
            result_path="$.guid",
        )

        task1 = sfn.Task(
            self, "Task 1 in Mapping",
            task=sfn_tasks.InvokeActivity(do_mapping_activity1),
            result_path="$.guid",
        )

        task2 = sfn.Task(
            self, "Task 2 in Mapping",
            task=sfn_tasks.InvokeActivity(do_mapping_activity2),
            result_path="$.guid",
        )

        wait_x = sfn.Wait(
            self, "Wait X Seconds",
            time=sfn.WaitTime.seconds_path('$.wait_time'),
        )
        get_status = sfn.Task(
            self, "Get Job Status",
            task=sfn_tasks.InvokeActivity(check_job_activity),
            input_path="$.guid",
            result_path="$.status",
        )
        is_complete = sfn.Choice(
            self, "Job Complete?"
        )
        job_failed = sfn.Fail(
            self, "Job Failed",
            cause="AWS Batch Job Failed",
            error="DescribeJob returned FAILED"
        )
        final_status = sfn.Task(
            self, "Get Final Job Status",
            task=sfn_tasks.InvokeActivity(check_job_activity),
            input_path="$.guid",
        )

        definition_map = task1.next(task2)

        process_map = sfn.Map(
            self, "Process_map",
            max_concurrency=10
        ).iterator(definition_map)

        definition = submit_job \
            .next(process_map) \
            .next(wait_x) \
            .next(get_status) \
            .next(is_complete
                  .when(sfn.Condition.string_equals(
                    "$.status", "FAILED"), job_failed)
                  .when(sfn.Condition.string_equals(
                    "$.status", "SUCCEEDED"), final_status)
                  .otherwise(wait_x))

        sfn.StateMachine(
            self, "StateMachine",
            definition=definition,
            timeout=core.Duration.seconds(30),
        )


cdk.json
{
    "app": "python3 app.py"
}

Useful Commands

  • cdk ls list all stacks in the app
  • cdk synth emits the synthesized CloudFormation template
  • cdk deploy deploy this stack to your default AWS account/region
  • cdk diff compare deployed stack with current state
  • cdk docs open CDK documentation

The cdk.json file tells the CDK Toolkit how to execute your app.


To manually create a virtualenv on MacOS and Linux:

$ python  -m venv .venv

After the init process completes and the virtualenv is created, you can use the following step to activate your virtualenv.

$ source .venv/Scripts/activate

If you are a Windows platform, you would activate the virtualenv like this:

% .venv\Scripts\activate.bat

Once the virtualenv is activated, you can install the required dependencies.

$ pip install -r requirements.txt

At this point you can now synthesize the CloudFormation template for this code.

$ cdk synth


Saturday, December 26, 2020

Provision AWS ECS & Fargate Load Balanced Service with AWS CDK (Python) Part 1

AWS Fargate is a serverless compute engine for containers that works with both Amazon Elastic Container Service (ECS) and Amazon Elastic Kubernetes Service (EKS). Fargate makes it easy for you to focus on building your applications. Fargate removes the need to provision and manage servers, lets you specify and pay for resources per application, and improves security through application isolation by design.

Fargate allocates the right amount of compute, eliminating the need to choose instances and scale cluster capacity. You only pay for the resources required to run your containers, so there is no over-provisioning and paying for additional servers. Fargate runs each task or pod in its own kernel providing the tasks and pods their own isolated compute environment. This enables your application to have workload isolation and improved security by design.  


This thread discusses aws-cdk (Python) to provision VPC/ECS and Fargate.


app.py

from aws_cdk import (

    aws_ec2 as ec2,

    aws_ecs as ecs,

    aws_ecs_patterns as ecs_patterns,

    core,

)

class ProvisionFargate(core.Stack):

      def __init__(self, scope: core.Construct, id: str, **kwargs) -> None:

        super().__init__(scope, id, *kwargs)

        # Create VPC and Fargate Cluster

        # NOTE: Limit AZs to avoid reaching resource quotas

        vpc = ec2.Vpc(

            self, "MindTelligentVpc",

            max_azs=2

        )

        cluster = ecs.Cluster(

            self, 'Ec2Cluster',

            vpc=vpc

        )


        fargate_service = ecs_patterns.NetworkLoadBalancedFargateService(

            self, "FargateService",

            cluster=cluster,

            task_image_options={

                'image': ecs.ContainerImage.from_registry("amazon/amazon-ecs-sample")

            }

        )


        fargate_service.service.connections.security_groups[0].add_ingress_rule(

            peer = ec2.Peer.ipv4(vpc.vpc_cidr_block),

            connection = ec2.Port.tcp(80),

            description="Allow http inbound from VPC"

        )


        core.CfnOutput(

            self, "LoadBalancerDNS",

            value=fargate_service.load_balancer.load_balancer_dns_name

        )


app = core.App()

ProvisionFargate(app, "MindTelligent")

app.synth()


requirements.txt

 aws-cdk.core
aws-cdk.aws_ec2
aws-cdk.aws_ecs
aws-cdk.aws_ecs_patterns

# Work around for jsii#413
aws-cdk.aws-autoscaling-common


How IdP Groups Are Tied to Databricks Groups (Unity Catalog)

  🔗 How IdP Groups Are Tied to Databricks Groups (Unity Catalog) 🔑 Key Principle (Read This First) Databricks does NOT “map” IdP groups...