Thursday, February 12, 2015

Oracle® Fusion Middleware OES-11g Release 2 (11.1.2.2.0) - Steps to Setup Auditing for OES

Oracle® Fusion Middleware OES-11g Release 2 (11.1.2.2.0) - Steps to Setup Auditing for OES


1Create an Oracle database for Audit purposes

2Run ./rcu to load the OES Audit schema, in database created in step number 1 Make sure to Select "AS Common Schema -> Audit Services for OES" set prefix -> AUDIT (important for next step)

3-Start APM domain and open weblogic console -> http://host:7001/console Create a JDBC connection, setting values according to your database Under JDBC, click the Data Sources link Create new jdbc Data Source JNDI Name -> jdbc/AuditDB user is the prefix set in RCU process + _IAUOES -> AUDIT_IAUOES  

password set during RCU -> welcome1
Make sure "Test Connection" is successful

4-Stop APM domain

5-Edit Oracle/Middleware/user-projects/domains/APM/config/fmwconfig/jps-config.xml,
Set Audit properties as follows

<serviceInstance name="audit" provider="audit.provider"> 
<property name="audit.filterPreset" value="All"/> 
<property name="audit.maxDirSize" value ="500000"/> 
<property name="audit.maxFileSize" value ="50000"/> 
<property name="audit.loader.jndi" value="jdbc/AuditDB"/>
 <property name="audit.loader.interval" value="15" /> 
<property name="audit.loader.repositoryType" value="Db" /> 
</serviceInstance>

6-Start APM Domain

7-Go to your Audit schema, and check the information stored Connect based your user info, for example -> ./sqlplus audit_iauoes/welcome1 run a sql to test, 


SELECT * FROM IAU_BASE WHERE ROWNUM<2, 

to check a couple of records where the information was stored


For more information on Audit schema refer to the  following documentation link in Oracle Fusion Middleware Application Security Guide (12.5 Advanced Management of Database Store):

8.) Ensure that your jps-config.xml is configured accurately as follows

<?xml version="1.0" encoding="UTF-8" standalone='yes'?>
<jpsConfig xmlns="http://xmlns.oracle.com/oracleas/schema/11/jps-config-11_1.xsd" 
          xmlns:xsi="http://www.w3.org/2001/XMLSchema-instance" 
 xsi:schemaLocation="http://xmlns.oracle.com/oracleas/schema/11/jps-config-11_1.xsd" 
 schema-major-version="11" schema-minor-version="1">

    <serviceProviders>
     <serviceProvider name="audit.provider" type="AUDIT" class="oracle.security.jps.internal.audit.AuditProvider">
     </serviceProvider>
    </serviceProviders>

  <serviceInstances>
   <serviceInstance name="audit" provider="audit.provider">
      <property name="audit.filterPreset" value="Low"/>
      <property name="audit.specialUsers" value ="admin, fmwadmin" />
      <property name="audit.customEvents" value ="JPS:CheckAuthorization, CreateCredential; OIF:UserLogin"/>
      <property name="audit.loader.jndi" value="jdbc/AuditDB"/>
      <property name="audit.loader.interval" value="15" />
      <property name="audit.maxDirSize" value="102400" />
      <property name="audit.maxFileSize" value="10240" />      
      <property name=" audit.loader.repositoryType " value="Db" />      
   </serviceInstance>
  </serviceInstances>
    <jpsContexts default="default">
        <jpsContext name="default">
            <serviceInstanceRef ref="audit"/>
        </jpsContext>
    </jpsContexts>
</jpsConfig>


Monday, January 5, 2015

Synchronize Deletion from AD to OID

Synchronize Deletion from AD to OID


Steps to be performed for the use case when the entry is deleted from AD, the corresponding entry in OID gets deleted using DIP
Resolution:
1.  isDeleted=TRUE should be added to the searchfilter.
For example, you may be using:
searchfilter=(|(objectclass=group)(objectclass=organizationalunit)(&(objectclass=user)(!(objectclass=computer))))
However, Deleted entries will fail. To correct this, modify the filter as follows:
searchfilter=(|(objectclass=group)(objectclass=organizationalunit)(&(objectclass=user)(!(objectclass=computer)))(isDeleted=TRUE))
login EM -> Farm -> Identity and Access -> right click on DIP -> select Administration: Synchronization profile from popup menu -> select the profile you are using -> click Edit -> click Filtering tab


2. Ensure the user that DIP is binding to AD has permissions to read the Deleted Objects container: cn=Deleted Objects,<domain name>
• For the DirSync approach:
The AD user must belong to the Domain Administrators group, cn=Administrators, cn=builtins,dc=domain,dc=com, or be explicitly granted permissions to
replicate directory changes.

• For the USNChanged approach:
The AD user must have “List Content” and “Read Properties” permissions to the cn=Deleted Objects container.


Tuesday, December 23, 2014

Oracle® Fusion Middleware OES-11g Release 2 (11.1.2.2.0) - Secure the XACML Authorization Web Service

Oracle® Fusion Middleware OES-11g Release 2 (11.1.2.2.0) - Secure the XACML Authorization Web Service 


To associate a WS-Policy file with a Web service:
  • If you have not already done so, in the Change Center of the Administration Console, click Lock & Edit  
  • In the left pane of the Administration Console, select Deployments.
  • In the right pane, navigate within the Deployments table until you find the Web service for which you want to configure a WS-Policy file.Note: Web services are deployed as part of an Enterprise application, Web application, or EJB. To understand how Web services are displayed in the Administration Console.
  • In the Deployments table, click the name of the Web service.


  • Select Configuration -> WS-Policy.The table lists the WS-Policy files that are currently associated with the Web service. The top level lists all the ports of the Web service. Click the + next to a Web service port to see its operations and associated WS-Policy files.


  • To associate a WS-Policy file with an entire Web service endpoint (port):
    • Click the name of the Web service port. A page appears which includes two columns: one labelled Available Endpoint Policies that lists the names of the WS-Policy files that you can attach to a Web service endpoint and one labelled Chosen Endpoint Policies that lists the WS-Policy files that are currently configured for this endpoint.
    • Use the arrows to move WS-Policy files between the available and chosen columns. The WS-Policy files that are in the Chosen column are attached to the Web service endpoint.
    • Click OK.If your Web service already has a deployment plan associated to it, then the newly attached WS-Policy files are displayed in the Policies column in the table.
      If the J2EE module of which the Web service is a part does not currently have a deployment plan associated with it, the assistant asks you for the directory that should contain the deployment plan. Use the navigation tree to specify a directory, then click Finish.


  • To associate a WS-Policy file with a Web service operation:
    • Click the name of the operation. A page appears which includes two columns: one labeled Available Message Policies that lists the names of the WS-Policy files that are available to attach to the inbound (request) and outbound (response) SOAP message of the operation invoke and one labeled Chosen Message Policies that lists the WS-Policy files that are currently attached to the inbound and outbound SOAP message of the operation invoke.
    • Use the arrows to move WS-Policy files between the available and chosen columns. The WS-Policy files that are in the Chosen column are the ones that are attached to the inbound and outbound SOAP message when this operation is invoked by a client application.
    • Click Next.
    • A page appears which includes two columns: one labeled Available Inbound Message Policies that lists the names of the WS-Policy files that are available to attach to the inbound (request) SOAP message of the operation invoke and one labeled Chosen Outbound Message Policies that lists the WS-Policy files that are currently attached to the inbound SOAP message of the operation invoke.
    • Use the arrows to move WS-Policy files between the available and chosen columns. The WS-Policy files that are in the Chosen column are the ones that are attached to the inbound (request) SOAP message when this operation is invoked by a client application.
    • Click Next.
    • A page appears which includes two columns: one labeled Available Outbound Message Policies that lists the names of the WS-Policy files that are available to attach to the outbound (response) SOAP message of the operation invoke and one labeled Chosen Outbound Message Policies that lists the WS-Policy files that are currently attached to the outbound SOAP message of the operation invoke.
    • Use the arrows to move WS-Policy files between the available and chosen columns. The WS-Policy files that are in the Chosen column are the ones that are attached to the outbound (response) SOAP message when this operation is invoked by a client application.
    • Click Finish.If your Web service already has a deployment plan associated with it, the attached WS-Policy files are displayed in the Policies column in the table.
      If the J2EE module of which the Web service is a part does not currently have a deployment plan associated with it, the assistant asks you for the directory that should contain the deployment plan. Use the navigation tree to specify a directory, then click Finish.

  • To activate these changes, in the Change Center of the Administration Console, click Activate Changes.


Friday, December 19, 2014

Oracle® Fusion Middleware SOA-11g Release 2 (11.1.1.7.0) XML Gateway Integration (Inbound) Part 2. Steps to build Oracle Apps Adapter connection from JDeveloper

Oracle® Fusion Middleware SOA-11g  XML Gateway Integration (Inbound) Part  2. Steps to build Oracle Apps Adapter connection from JDeveloper


  • Open JDeveloper and create a new SOA Project


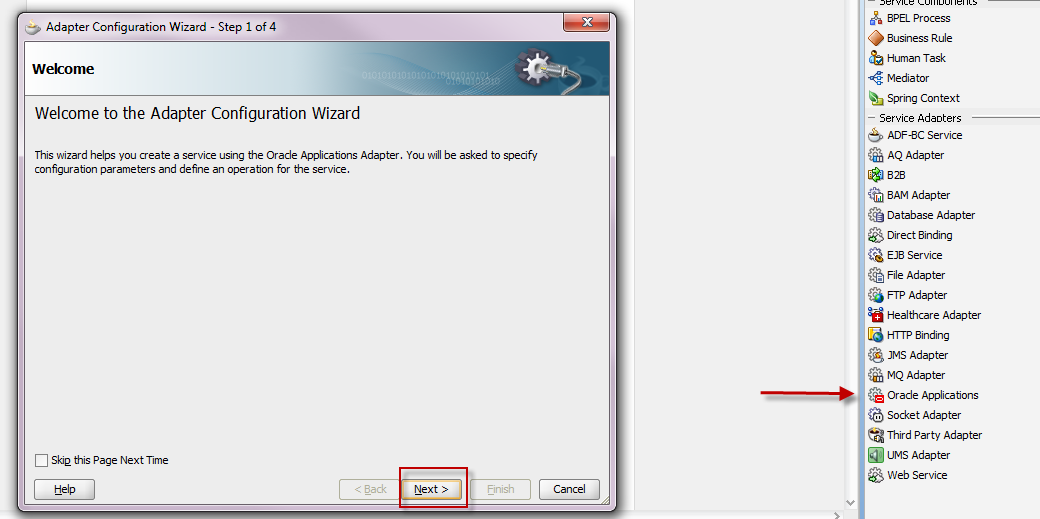
  • On the composite design screen, click on Oracle Applications. This will bring up the Adapter Configuration Screen. Click Next.


  • Enter the Service Name and press Next.


  • Enter the DB Connection Name and the JNDI Connection Name that was created using Post  http://oraclesoaandoim.blogspot.com/2014/12/oracle-fusion-middleware-soa-11g.html
  • Press Next


  • Navigate to Other Interfaces Custom Objects and Choose XML Gateway as an option and select the desired Map in XML Gateway


  • Choose the specific schema tied to XML Gateway.

  • This creates Oracle Apps Adapter for the use within the composite.
  • Please ensure that the following header properties are set from withing Invoke of BPEL process 

    <invoke name="InvokeWriteToECXQueue"
                  inputVariable="InvokeWriteToECXQueue_Enqueue_InputVariable"
                  partnerLink="WriteToECXQueue" portType="ns7:Enqueue_ptt"
                  operation="Enqueue" bpelx:invokeAsDetail="no">
            <bpelx:inputProperty name="jca.apps.ecx.TransactionType"
                                 expression='"MINDTELLIGENT"'/>
            <bpelx:inputProperty name="jca.apps.ecx.TransactionSubtype"
                                 expression='"MINDTELLIGENT_RECV"'/>
            <bpelx:inputProperty name="jca.apps.ecx.PartySiteId"
                                 expression='"112233"'/>
            <bpelx:inputProperty name="jca.apps.ecx.MessageType"
                                 expression='"XML"'/>
            <bpelx:inputProperty name="jca.apps.ecx.MessageStandard"
                                 expression='"OAG"'/>
            <bpelx:inputProperty name="jca.apps.ecx.DocumentNumber"
                                 expression='"1234"'/>
          </invoke>
        </sequence>


Oracle® Fusion Middleware SOA-11g Release 2 (11.1.1.7.0) INBOUND XML Gateway Integration (Inbound) Part 1. Create Oracle Apps Adapter Connection Pool


Oracle® Fusion Middleware SOA-11g   (11.1.1.7.0) XML Gateway Integration (Inbound) Part 1. Create Oracle Apps Adapter Connection Pool

This thread discusses steps to build a SOA composite with Oracle Applications Adapter using JDeveloper.


  • Using the Admin Console, navigate to Deployments-> OracleAppsAdapter


  • Click on Configuration->Outbound Connection Pools -> New-> Choose  javax.resource.cci.ConnectionFactory


  • Enter JNDI Name and press finish. 


  • Ensure XA Data Source Name is created correctly and press Save.


  • Go Back To Deployments->OracleAppsAdapter. Click on the Check Box and Press Update.


  • Restart the Server

Monday, December 15, 2014

Oracle® Fusion Middleware OES-11g Release 2 (11.1.2.2.0) Create delegated administrator

Oracle® Fusion Middleware OES-11g Release 2 (11.1.2.2.0) Create delegated administrator 


  • Expand the Applications node in the Navigation Panel.
  • Select the Application to modify.
  • Right-click the Application name and select Open from the menu. The General, Delegated Administrators, Policy Distribution and Simulation tabs are all active.
  • Click the Delegated Administrators tab. The Application name is listed in the displayed table. Click the arrow next to the Application name to see the default ApplicationPolicyAdmin created when the Application object was created. Click the Administrator Role name to display its details, in tabs, below the Delegated Administrators table. 
    • Role Details
    • External Role Mapping
    •  External User Mapping
  • Click New to create a new Administrator Role. Be sure to select the name of the Application to activate New. Alternately, select the Application and select New from the Actions menu. A New Administrator Role dialog is displayed.


  • Provide the following values for the new Administrator Role and click OK. Delegating Application Administration  Name: The entry must be a unique.  Display Name and  Description


  • Select the new Administrator Role to activate its configuration tabs. The Role Details tab is active.
  • Click Edit to define the role details. An Edit Administrator Role dialog is displayed.
  •  Grant View or Manage privileges for the appropriate policy objects and click Save.

Select View or Manage for the listed policy objects. For example, Admin Policy allows the administrator to assign new permissions to an Admin Role. Admin Role, however, allows the administrator to assign members to an Admin Role. 


  • Click the External Role Mapping tab to grant the Administrator Role to members of External Roles. User and groups displayed are from the first LDAP provider with sufficient flag defined in WebLogic Server.
  • Click Add to display the Search Principals dialog.
  •  Complete the query fields in the External Roles search box and click Search. Empty strings fetch all roles. The results display in the Search Results table.
  • Select the external role to map to by clicking its name in the table. Use Ctrl+click to select multiple roles.
  • Click Add Principals. The selected roles display in the External Role Mapping tab.


Oracle® Fusion Middleware OES-11g Release 2 (11.1.2.2.0) Steps to create an obligation

Oracle® Fusion Middleware OES-11g Release 2 (11.1.2.2.0) Steps to create an obligation


The Security Module PDP evaluates the request and returns a response (and applicable obligations) to the PEP in the form of an authorization decision to grant or deny access. 

The PEP fulfills any obligations, if applicable. An obligation is information returned with the decision upon which the PEP may or may not act. For example, an obligation may contain additional information concerning a decision to deny. The PEP entity is responsible for obligation fulfillment based on its settings. Oracle Entitlements Server is only responsible for forwarding the obligation based on policy configuration.

This thread discusses steps to create an Obligation for a policy.


  • Create an attribute as shown in the examples getChildPersons. The attribute should of Category: Dynamic; Input Values:  Multiple; Type: String

  • Navigate to the authorization policy and create a new obligation by choosing the getChildPersons from the List of Attributes from the window.

  •        In the PIP AttributeRetriever code populate the attribute to return the obligation "getChildPersons" 
            } else if ("getChildPersons".equals(string)) {            return ( ............);
            }


How IdP Groups Are Tied to Databricks Groups (Unity Catalog)

  🔗 How IdP Groups Are Tied to Databricks Groups (Unity Catalog) 🔑 Key Principle (Read This First) Databricks does NOT “map” IdP groups...