Tuesday, October 5, 2021

Installing packages using pip and virtual environments


Installing packages using pip and virtual environments

This guide discusses how to install packages using pip and a virtual environment manager: either venv for Python 3 or virtualenv for Python 2. These are the lowest-level tools for managing Python packages and are recommended if higher-level tools do not suit your needs.

Note


This doc uses the term package to refer to a Distribution Package which is different from an Import Package that which is used to import modules in your Python source code.

Installing pip

pip is the reference Python package manager. It’s used to install and update packages. You’ll need to make sure you have the latest version of pip installed.

The Python installers for Windows include pip. You can make sure that pip is up-to-date by running:

py -m pip install --upgrade pip

py -m pip --version

Afterwards, you should have the latest version of pip:

pip 21.1.3 from c:\python39\lib\site-packages (Python 3.9.4)

Installing virtualenv

Note


If you are using Python 3.3 or newer, the venv module is the preferred way to create and manage virtual environments. venv is included in the Python standard library and requires no additional installation. If you are using venv, you may skip this section.

virtualenv is used to manage Python packages for different projects. Using virtualenv allows you to avoid installing Python packages globally which could break system tools or other projects. You can install virtualenv using pip.

py -m pip install --user virtualenv

Creating a virtual environment

venv (for Python 3) and virtualenv (for Python 2) allow you to manage separate package installations for different projects. They essentially allow you to create a “virtual” isolated Python installation and install packages into that virtual installation. When you switch projects, you can simply create a new virtual environment and not have to worry about breaking the packages installed in the other environments. It is always recommended to use a virtual environment while developing Python applications.

To create a virtual environment, go to your project’s directory and run venv. If you are using Python 2, replace venv with virtualenv in the below commands.

py -m venv env

The second argument is the location to create the virtual environment. Generally, you can just create this in your project and call it env.

venv will create a virtual Python installation in the env folder.

Note


You should exclude your virtual environment directory from your version control system using .gitignore or similar.

Activating a virtual environment

Before you can start installing or using packages in your virtual environment you’ll need to activate it. Activating a virtual environment will put the virtual environment-specific python and pip executables into your shell’s PATH.

.\env\Scripts\activate

You can confirm you’re in the virtual environment by checking the location of your Python interpreter:

where python

It should be in the env directory:

...\env\Scripts\python.exe

As long as your virtual environment is activated pip will install packages into that specific environment and you’ll be able to import and use packages in your Python application.

Leaving the virtual environment

If you want to switch projects or otherwise leave your virtual environment, simply run:

deactivate

If you want to re-enter the virtual environment just follow the same instructions above about activating a virtual environment. There’s no need to re-create the virtual environment.

Installing packages

Now that you’re in your virtual environment you can install packages. Let’s install the Requests library from the Python Package Index (PyPI):

py -m pip install requests

pip should download requests and all of its dependencies and install them:

Collecting requests
  Using cached requests-2.18.4-py2.py3-none-any.whl
Collecting chardet<3.1.0,>=3.0.2 (from requests)
  Using cached chardet-3.0.4-py2.py3-none-any.whl
Collecting urllib3<1.23,>=1.21.1 (from requests)
  Using cached urllib3-1.22-py2.py3-none-any.whl
Collecting certifi>=2017.4.17 (from requests)
  Using cached certifi-2017.7.27.1-py2.py3-none-any.whl
Collecting idna<2.7,>=2.5 (from requests)
  Using cached idna-2.6-py2.py3-none-any.whl
Installing collected packages: chardet, urllib3, certifi, idna, requests
Successfully installed certifi-2017.7.27.1 chardet-3.0.4 idna-2.6 requests-2.18.4 urllib3-1.22

Installing specific versions

pip allows you to specify which version of a package to install using version specifiers. For example, to install a specific version of requests:

py -m pip install requests==2.18.4

To install the latest 2.x release of requests:

py -m pip install requests>=2.0.0,<3.0.0

To install pre-release versions of packages, use the --pre flag:

py -m pip install --pre requests

Installing extras

Some packages have optional extras. You can tell pip to install these by specifying the extra in brackets:

py -m pip install requests[security]

Installing from source

pip can install a package directly from source, for example:

cd google-auth
py -m pip install .

Additionally, pip can install packages from source in development mode, meaning that changes to the source directory will immediately affect the installed package without needing to re-install:

py -m pip install --editable .

Installing from version control systems

pip can install packages directly from their version control system. For example, you can install directly from a git repository:

git+https://github.com/GoogleCloudPlatform/google-auth-library-python.git#egg=google-auth

For more information on supported version control systems and syntax, see pip’s documentation on VCS Support.

Installing from local archives

If you have a local copy of a Distribution Package’s archive (a zip, wheel, or tar file) you can install it directly with pip:

py -m pip install requests-2.18.4.tar.gz

If you have a directory containing archives of multiple packages, you can tell pip to look for packages there and not to use the Python Package Index (PyPI) at all:

py -m pip install --no-index --find-links=/local/dir/ requests

This is useful if you are installing packages on a system with limited connectivity or if you want to strictly control the origin of distribution packages.

Using other package indexes

If you want to download packages from a different index than the Python Package Index (PyPI), you can use the --index-url flag:

py -m pip install --index-url http://index.example.com/simple/ SomeProject

If you want to allow packages from both the Python Package Index (PyPI) and a separate index, you can use the --extra-index-url flag instead:

py -m pip install --extra-index-url http://index.example.com/simple/ SomeProject

Upgrading packages

pip can upgrade packages in-place using the --upgrade flag. For example, to install the latest version of requests and all of its dependencies:

py -m pip install --upgrade requests

Using requirements files

Instead of installing packages individually, pip allows you to declare all dependencies in a Requirements File. For example you could create a requirements.txt file containing:

requests==2.18.4
google-auth==1.1.0

And tell pip to install all of the packages in this file using the -r flag:

py -m pip install -r requirements.txt

Freezing dependencies

Pip can export a list of all installed packages and their versions using the freeze command:

py -m pip freeze

Which will output a list of package specifiers such as:

cachetools==2.0.1
certifi==2017.7.27.1
chardet==3.0.4
google-auth==1.1.1
idna==2.6
pyasn1==0.3.6
pyasn1-modules==0.1.4
requests==2.18.4
rsa==3.4.2
six==1.11.0
urllib3==1.22

This is useful for creating Requirements Files that can re-create the exact versions of all packages installed in an environment.

Thursday, September 30, 2021

AWS - Create Layers for Lambda for Python

 AWS - Create Layers for Lambda for Python

When working with Python 3 runtimes the layer needs to follow a particular folder structure otherwise you will receive errors as the Python runtime is unable to find the module. 

1. install jwt to a target directory using pip, ie pip3 install jwt -t jwt 

2. Navigate to the jwt directory which contains the dependency files for the JWT module, create a directory named python and copy all the files into this directory 

3. Zip the python directory, the zip file should contain the directory "python" that contains the lambda dependency files 

4. Create the layer to the Lambda console[2] and copy it's ARN 

5. Add the layer to your Lambda function by navigating to the Lambda function, and click on the "Layers" link at the top of the page, copy the layer's ARN into the "Specify an ARN" input box and choose the "specify an ARN" option. 

To test to make sure the Lambda is configured correctly you can add "import jwt" at the top of your Python file and run the function. 

If the layer is incorrectly configured, you will receive an error indicating that the function cannot find the simple-salesforce library. If the function executes OK at this point, then the layer is correctly configured and can be used.

The directory structure will be for e.g.

  /LayersWorkingDirectory/

 1. mkdir python 

2. cd python 

3. python3 -m pip install simple-salesforce -t . 

4. cd .. 

5. zip -r9 salesforce.zip python 

6. Use "salesforce.zip" to create a layer and use it with the function. 


Wednesday, February 17, 2021

AWS VPC endpoints configuration to use Systems Manager to manage private EC2 instances without internet access

Amazon EC2 instances must be registered as managed instances to be managed with AWS Systems Manager. Follow these steps:

  1. Verify that SSM Agent is installed on the instance.
  2. Create an AWS Identity and Access Management (IAM) instance profile for Systems Manager. You can create a new role, or add the needed permissions to an existing role.
  3. Attach the IAM role to your private EC2 instance.
  4. Open the Amazon EC2 console, and then select your instance. On the Description tab, note the VPC ID and Subnet ID.
  5. Create a VPC endpoint for Systems Manager.
    For Service Name, select com.amazonaws.[region].ssm (for example, com.amazonaws.us-east-1.ssm). For a full list of Region codes, see Available Regions.
    For VPC, choose the VPC ID for your instance.
    For Subnets, choose the Subnet ID for your instance. Be sure to choose subnets from different Availability Zones within the Region.
    Note: If you have more than one subnet in the same Availability Zone, you don't need to create VPC endpoints for the extra subnets. Any other subnets within the same Availability Zone can access and use the interface.
    For Enable DNS name, select Enable for this endpoint. For more information, see Private DNS for interface endpoints.
    For Security group, select an existing security group, or create a new one. If you created a new security group, open the VPC console, choose Security Groups, and then select the new security group. On the Inbound rules tab, choose Edit inbound rules. Add a rule with the following details, and then choose Save rules.
    For Type, choose HTTPS.
    For Source, choose your VPC/Subnet CIDR.
    Note the Security group ID. You'll use this ID with the other endpoints.
    Optional: For advanced setup, create policies for VPC interface endpoints for AWS Systems Manager.
  6. Repeat step 5 with the following change:
    For Service Name, select com.amazonaws.[region].ec2messages.
  7. Repeat step 5 with the following change:
    For Service Name, select com.amazonaws.[region].ssmmessages. You must do this if you want to use Session Manager.

After the three endpoints are created, your instance appears in Managed Instances, and can be managed using Systems Manager.


Tuesday, February 2, 2021


 Deployment of SpringBoot Services on AWS Elastic Container Services: Part 5  Deploy Service

For the forth part of this thread, please click on Part 4

Deploy the monolith as a service into the cluster.

  • Navigate to the Amazon ECS console and select Clusters from the left menu bar.
  • Select the cluster select the Services tab then select Create.
  • On the Configure service page, edit the following parameters (and keep the default values for parameters not listed below): 
    • For the Launch type, select EC2.
    • For the Service name, enter api. 
    • For the Number of tasks, enter 1.
    • Select Next step.
  • On the Configure network page, Load balancing section, select Application Load Balancer.
    Additional parameters will apear: Service IAM role and Load balancer name.
    • For the Service IAM role, select SprinBootRole.
    • For the Load balancer name, verify that the appropriate load balancer is selected.
  • In the Container to load balance section, select Add to load balancer.
    Additional information labeled api:3000 is shown.
  • In the api:3000 section, do the following:
    • For the Production listener port field, select 80:HTTP.
    • For the Target group name, select your group: api.
  • In the Service discovery section, Enable service discovery integration option, clear the checkmark. This option should not be enabled.
  • Select Next step.
  • On the Set Auto Scaling page, leave the default setting and select Next step.
  • On the Review page, review the settings then select Create Service.
  • After the service has been created, select View Service.

 Deployment of SpringBoot Services on AWS Elastic Container Services: Part 4 Configure Application Load Balancer Target Groups and Application Load Balancer Listener

For the third part of this thread, please click on Part 3

The Application Load Balancer (ALB) lets your service accept incoming traffic. The ALB automatically routes 

traffic to container instances running on your cluster using them as a target group.

Check your VPC Name: If this is not your first time using this AWS account, you may have multiple VPCs. 

It is important to configure your Target Group with the correct VPC.

  • Navigate to the Load Balancer section of the EC2 Console.
  • Locate the appropriate load balancer.

  • Select the checkbox next to the appropriate load balancer to see the Load Balancer details.
  • In the Description tab, locate the VPC attribute (in this format: vpc-xxxxxxxxxxxxxxxxx).Configure the ALB 
  • Target Group

A target group tells a load balancer where to direct traffic to : EC2 instances, fixed IP addresses; or AWS Lambda functions, amongst others. When creating a load balancer, you create one or more listeners and configure listener rules to direct the traffic to one target group.
  • Navigate to the Target Group section of the EC2 Console.
  • Select Create target group.
  • Configure the following Target Group parameters (for the parameters not listed below,
  •  keep the default values):
    • For the Target group name, enter api.
    • For the Protocol, select HTTP.
    • For the Port, enter 80.
    • For the VPC, select the value that matches the one from the Load Balancer description. 
    • This is most likely NOT your default VPC.
    • Access the Advanced health check settings and edit the following parameters as needed: 
      • For Healthy threshold, enter 2.
      • For Unhealthy threshold, enter 2.
      • For Timeout, enter 5.
      • For Interval, enter 6.
  • Select Create.


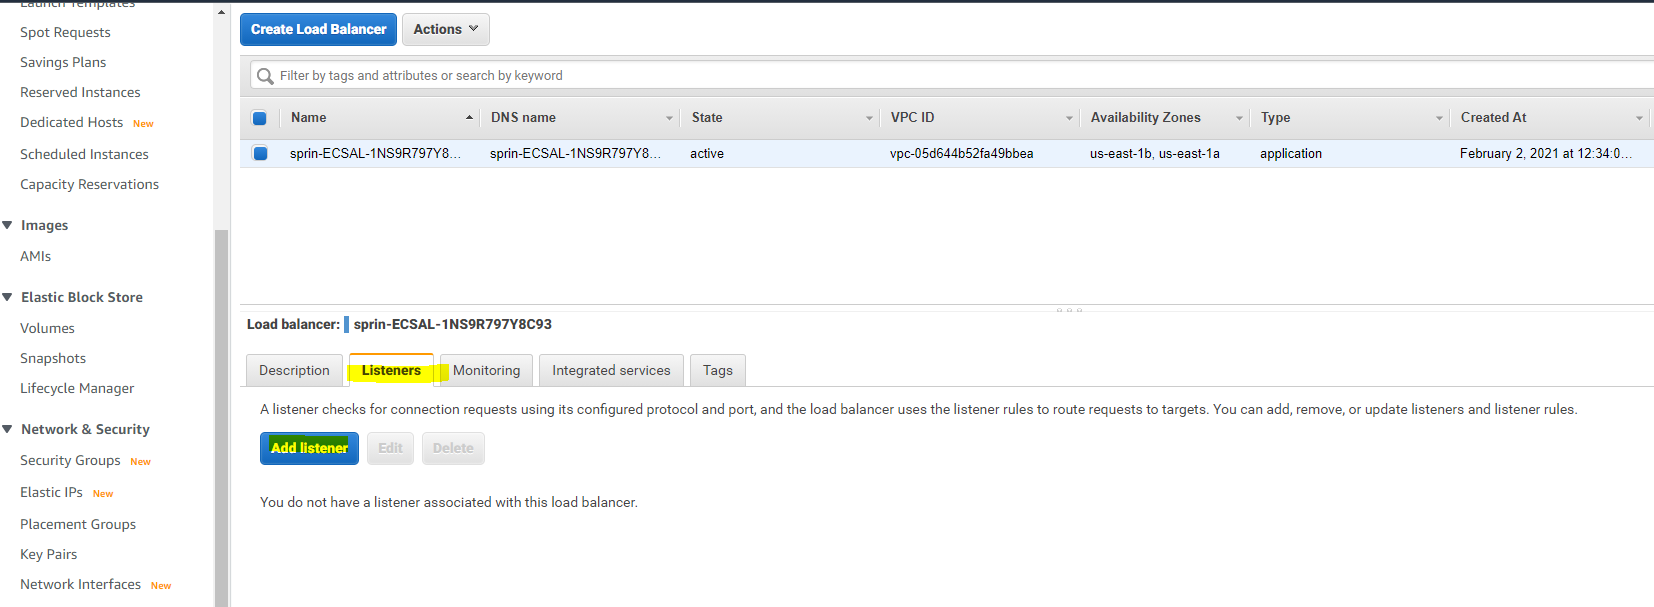
The ALB listener checks for incoming connection requests to your ALB.

Add a Listener to the ALB


  • Select Add listener and edit the following parameters as needed:
    • For Protocol:port, select HTTP and enter 80.
    • For Default action(s), select Forward to and in the Target group field, enter api.
  • Select Save.


Deployment of SpringBoot Services on AWS Elastic Container Services: Part 3 Create Task Definitions

Deployment of SpringBoot Services on AWS Elastic Container Services: Part 3 Create Task Definitions

For the second part of this thread, please click on Part 2


Task definitions specify how Amazon ECS deploys the application containers across the cluster.

  • From the Amazon ECS left navigation menu, select Task Definitions.
  • Select Create new Task Definition.


  • On the Select launch type compatibility page, select the EC2 option then select Next step.


  • On the Configure task and container definitions page, do the following:
    • In the Task Definition Name field, enter api.
    • Scroll down to Container Definitions and select Add container.
    • In the Add container window:
      • Parameters that are not defined can be either left blank or with the default settings.
      • In the Container name field, enter api.
      • In the Image field, enter [account-ID].dkr.ecr.[region].amazonaws.com/api:v1
        Replace [account-ID] and [region] with your specific information. Ensure the tag v1 matches the value you used in Module 1 to tag and push the image. This is the URL of your ECR repository image that was created in the previous module.
      • In the Memory Limits field, verify Hard limit is selected and enter 256 as the value.
      • Under Port mappings, Host port = 0 and Container port = 3000.
      • Scroll to ENVIRONMENT, CPU units = 256.
  • Select Add.
    You will return to the Configure task and container definitions page.
  • Scroll to the bottom of the page and select Create.

Your Task Definition is listed in the console.


The Task Definition looks like as follows:


How IdP Groups Are Tied to Databricks Groups (Unity Catalog)

  🔗 How IdP Groups Are Tied to Databricks Groups (Unity Catalog) 🔑 Key Principle (Read This First) Databricks does NOT “map” IdP groups...