Sunday, June 10, 2012

Oracle BPEL Process Manager Performance Tuning: Change SyncMaxWaitTime

Oracle BPEL Process Manager Performance Tuning: Change SyncMaxWaitTime


The SyncMaxWaitTime property sets the maximum time the process result receiver waits for a result before returning. Results from asynchronous BPEL processes are retrieved synchronously by a receiver that waits for a result from Oracle BPEL Server. This property is applicable to transient processes. The default value is 45 seconds. This property controls the maximum time the process result receiver will wait for a result before returning for Sync processes.

To change the property using Enterprise Manager:


  • Expand soa-infra 
  • Right Click
  • Expand SOA Administration


  • Clkick BPEL Properties.
  • This will navigate you to BPEL Properties page.

  • On the BPEL Service Engine Properties, click on More BPEL Configuration Properties...


  • Look for  SyncMaxWaitTimeand change the value. The default value is 45 seconds
  • Click Apply on Upper Right section of the page.

Saturday, June 9, 2012

Oracle SOA 11.1.1.5 Generate XSD From a Flat File

Oracle SOA 11.1.1.5 Generate XSD From a Flat File


This thread discusses steps to create an XML Schema (XSD) from a sample payload. The payload we are discussing here is a CSV file. The CSV file has header records, and the thread will highlight how the contents of the header records can be used in defining the elements of the generated schema.


  • Create a new SOA Project using JDeveloper you may call it GenerateXSDFormFlatFile. as shown below.
  • Press Next.


  • Choose the Empty Composite option .
  • Press Next.


  • From the resource pallet, choose the File Adapter in the Exposed Services Swim Lane.
  • Press Next.


  • Put the Service Name GenerateXSDFromFlatFile_FileAdapter.


  • Choose "Define from operation and schema" option.
  • Press Next.


  • Choose the option to Read File.
  • Choose Operation Name as Read.
  • Press Next.


  • Choose the directory where the file is located.
  • Press Next.


  • Choose the name of the file.
  • Press Next.


  • Press Next.


  • Ensure that the Native Format translation is not required is Unchecked.
  • On the Right Hand Side, click the Icon to Define Native Format.


  • Welcome screen will be displayed.
  • Press Next.


  • Since our file is comma delimited, choose this Delimited option.
  • Press Next.


  • Ensure that the file name is correct
  • Press Next.


  • Enter a name that will represent the record, Employee in this case.
  • Press Next.


  • Choose the Delimited By Symbol, Comma(,).
  • Press Next.


  • Check the Use the first record as the Field Name. This will ensure that entries in the header record are reflected as the elements of the schema.
  • Press Next.


  • The schema is generated in the xsd folder of the project.
  • Press Next.


  • Press Finish.


The Generated XSD looks like


<?xml version="1.0" encoding="UTF-8" ?>


<xsd:schema xmlns:xsd="http://www.w3.org/2001/XMLSchema"
            xmlns:nxsd="http://xmlns.oracle.com/pcbpel/nxsd"
            xmlns:tns="http://TargetNamespace.com/ServiceName"
            targetNamespace="http://TargetNamespace.com/ServiceName"
            elementFormDefault="qualified"
            attributeFormDefault="unqualified"


            nxsd:version="NXSD"
            nxsd:stream="chars"
            nxsd:encoding="US-ASCII"
            nxsd:hasHeader="true"
            nxsd:headerLines="1"
            nxsd:headerLinesTerminatedBy="${eol}"
>


  <xsd:element name="Root-Element">
    <xsd:complexType>
      <xsd:sequence>
        <xsd:element name="Employee" minOccurs="1" maxOccurs="unbounded">
          <xsd:complexType>
            <xsd:sequence>
              <xsd:element name="FirstName" type="xsd:string" nxsd:style="terminated" nxsd:terminatedBy="," nxsd:quotedBy="&quot;" />
              <xsd:element name="LastName" type="xsd:string" nxsd:style="terminated" nxsd:terminatedBy="," nxsd:quotedBy="&quot;" />
              <xsd:element name="Age" type="xsd:string" nxsd:style="terminated" nxsd:terminatedBy="," nxsd:quotedBy="&quot;" />
              <xsd:element name="DOB" type="xsd:string" nxsd:style="terminated" nxsd:terminatedBy="," nxsd:quotedBy="&quot;" />
              <xsd:element name="Salary" type="xsd:string" nxsd:style="terminated" nxsd:terminatedBy="${eol}" nxsd:quotedBy="&quot;" />
            </xsd:sequence>
          </xsd:complexType>
        </xsd:element>
      </xsd:sequence>
    </xsd:complexType>
  </xsd:element>


</xsd:schema>
<!--NXSDWIZ:C:\MindTelligent\Empoloyees.txt:-->
<!--USE-HEADER:true:-->




Monday, June 4, 2012

How Oracle WSM Locates Keystore And Key Passwords


How Oracle WSM (Oracle Web Service Manager) Locates Keystore And Key Passwords

Oracle WSM expects keystore and key passwords to be in the Credential Store Framework (CSF). Here is how it works.
  • A JKS keystore file is protected by a keystore password.
  • A keystore file consists of zero or more private keys, and zero or more trusted certificates. Each private key has its own password, (although it is common to set the key passwords to be the same as the keystore password). Oracle WSM needs to know both the keystore password and key password.
  • The CSF consists of many maps, each with a distinct name. Oracle WSM only uses the map oracle.wsm.security.
  • Inside each map is a mapping from multiple csf-key entries to corresponding credentials. A csf-key is just a simple name, but there can be many different types of credentials. The most common type of credential is a password credential which is primarily comprised of a username and a password.
    Oracle WSM refers to the following csf-keys inside the oracle.wsm.security map:
    • keystore-csf-key - This key should contain the keystore password. The username is ignored.
    • enc-csf-key - This key should contain the encryption key alias as the username, and the corresponding key password.
    • sign-csf-key - This key should contain the signature key alias as the username, and the corresponding key password.
    In addition to these csf-keys, you should add a csf-key entry for every new private key that you want Oracle WSM to use, for example when you want to specify signature and encryption keys in configuration overrides.
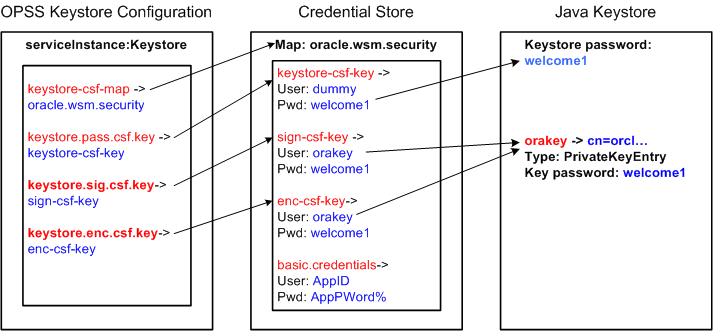
Figure  illustrates the relationship between the keystore configuration in the OPSS, the oracle.wsm.security map in the credential store, and the Oracle WSM Java keystore.

Figure 10-8 Oracle WSM Keystore Configuration for Message Protection
Description of Figure 10-8 follows
As shown in the figure:
  • The keystore.csf.map property points to the Oracle WSM map in the credential store that contains the CSF aliases. In this case keystore.csf.map is defined as the recommended name oracle.wsm.security, but it can be any value.
  • The keystore.pass.csf.key property points to the CSF alias keystore-csf-key that is mapped to the username and password of the keystore. Only the password is used; username is redundant in the case of the keystore.
  • The keystore.sig.csf.key property points to the CSF alias sign-csf-key that is mapped to the username and password of the private key that is used for signing.
  • The keystore.enc.csf.key property points to the CSF alias enc-csf-key that is mapped to the username and password of the private key that is used for decryption.

Weblogic 10.3.5: WLST Scripts to Configure Credential Store Framework (CSF) For Access Level/Message Level security


Weblogic 10.3.5: WLST Scripts to Configure Credential Store Framework (CSF) For Access Level/Message Level security.

Follow these steps to configure the credential store to access the Oracle WSM keystore using WLST commands


  • Go to the Oracle Common home directory for your installation, for example /home/Oracle/Middleware/oracle_common.

  • Start WLST using the WLST.sh/cmd command located in the oracle_common/common/bin directory. For example:
  • /home/Oracle/Middleware/oracle_common/common/bin/wlst.sh (UNIX)
  • C:\Oracle\Middleware\oracle_common\common\bin\wlst.cmd (Windows)
                 When executed, these commands start WLST in offline mode. To use the credential store WLST  
                 commands, you must use WLST in online mode.

    • Start Oracle WebLogic Server. 

    • Connect to the running WebLogic Server instance using the connect() command. For example, the following command connects WLST to the Administration Server at the URLmyAdminServer.oracle.com:7001 using the username/password credentials weblogic/welcome1:


      connect("weblogic","welcome1","t3://myAdminServer.oracle.com:7001")
      
      
      Enter the createCred command to create an entry in the credential store for the keystore name and password as follows:
      createCred(map="oracle.wsm.security", key="keystore-csf-key", user="owsm", password="welcome1", desc="Keystore key")


      Enter the createCred command to create an entry in the credential store for the keystore name and password as follows:
      
      
      createCred(map="oracle.wsm.security", key="keystore-csf-key", user="owsm", password="welcome1", desc="Keystore key")
      
      
      Enter the createCred command to create an entry in the credential store for the signature key alias and password as follows:
      createCred(map="oracle.wsm.security", key="sign-csf-key", user="orakey", password="welcome1", desc="Signing key")
      Enter the createCred command to create an entry in the credential store for the encryption key alias and password as follows:
      createCred(map="oracle.wsm.security", key="enc-csf-key", user="orakey", password="welcome1", desc="Encryption key")

    Use SSH Keys to clone GIT Repository using SSH

      1. Generate a New SSH Key Pair bash ssh-keygen -t rsa -b 4096 -C "HSingh@MindTelligent.com" -t rsa specifies the type of key (...