Wednesday, September 19, 2018

Oracle SOA Stack 12.2.1.3

SOA Suite 12c has a new  component: Oracle Enterprise Scheduler Service (ESS). ESS provides the ability to run different job types distributed across the nodes in an Oracle WebLogic Server cluster. Oracle Enterprise Scheduler runs these jobs securely, with high availability and scalability, with load balancing and provides monitoring and management through Fusion Middleware Control. ESS was available as part of the Fusion Applications product offering. Now it is available in SOA Suite 12c. In this blog, I will demonstrate how to use a new Oracle extension, “Schedule Job”, in JDeveloper 12c to submit an ESS job request from a BPEL process.


Set up a scheduled job in Enterprise Scheduler Service

  • Create a SOA composite with a simple synchronous BPEL process, HelloFromMindTelligent.
  • Deploy HelloFromMindTelligent to SOA using Enterprise Manager.

  • Logon to Fusion Middleware Enterprise Manager.
  • Go to Scheduling Services -> ESSAPP -> Job Metadata -> Job Definitions. This takes you to the Job Definitions page.


  • Click the “Create” button, this takes you to Create Job Definition page. Enter:
Name: HelloFromMindTelligentJob
Display Name: HelloFromMindTelligentJob
Description: HelloFromMindTelligentJob
Job Type: SyncWebserviceJobType


  • Select  Web service


Secure the Oracle Enterprise Scheduler Web Service

The ESS job cannot be run as an anonymous user, you need to attach a WSM security policy to the ESS Web Service:
  • In Fusion Middleware Enterprise Manager, go to Scheduling Services -> ESSAPP, right click, select “Web Services”.


  • In Web Service Details, click on the link “ScheduleServiceImplPort”.


  • Open tab “WSM Policies” and click on “Attach/Detach”.


  • In “Available Policies”, select “oracle/wss_username_token_service_policy”, click “Attach” button to attach the policy and then click on “Ok” to finish the policy attachment.


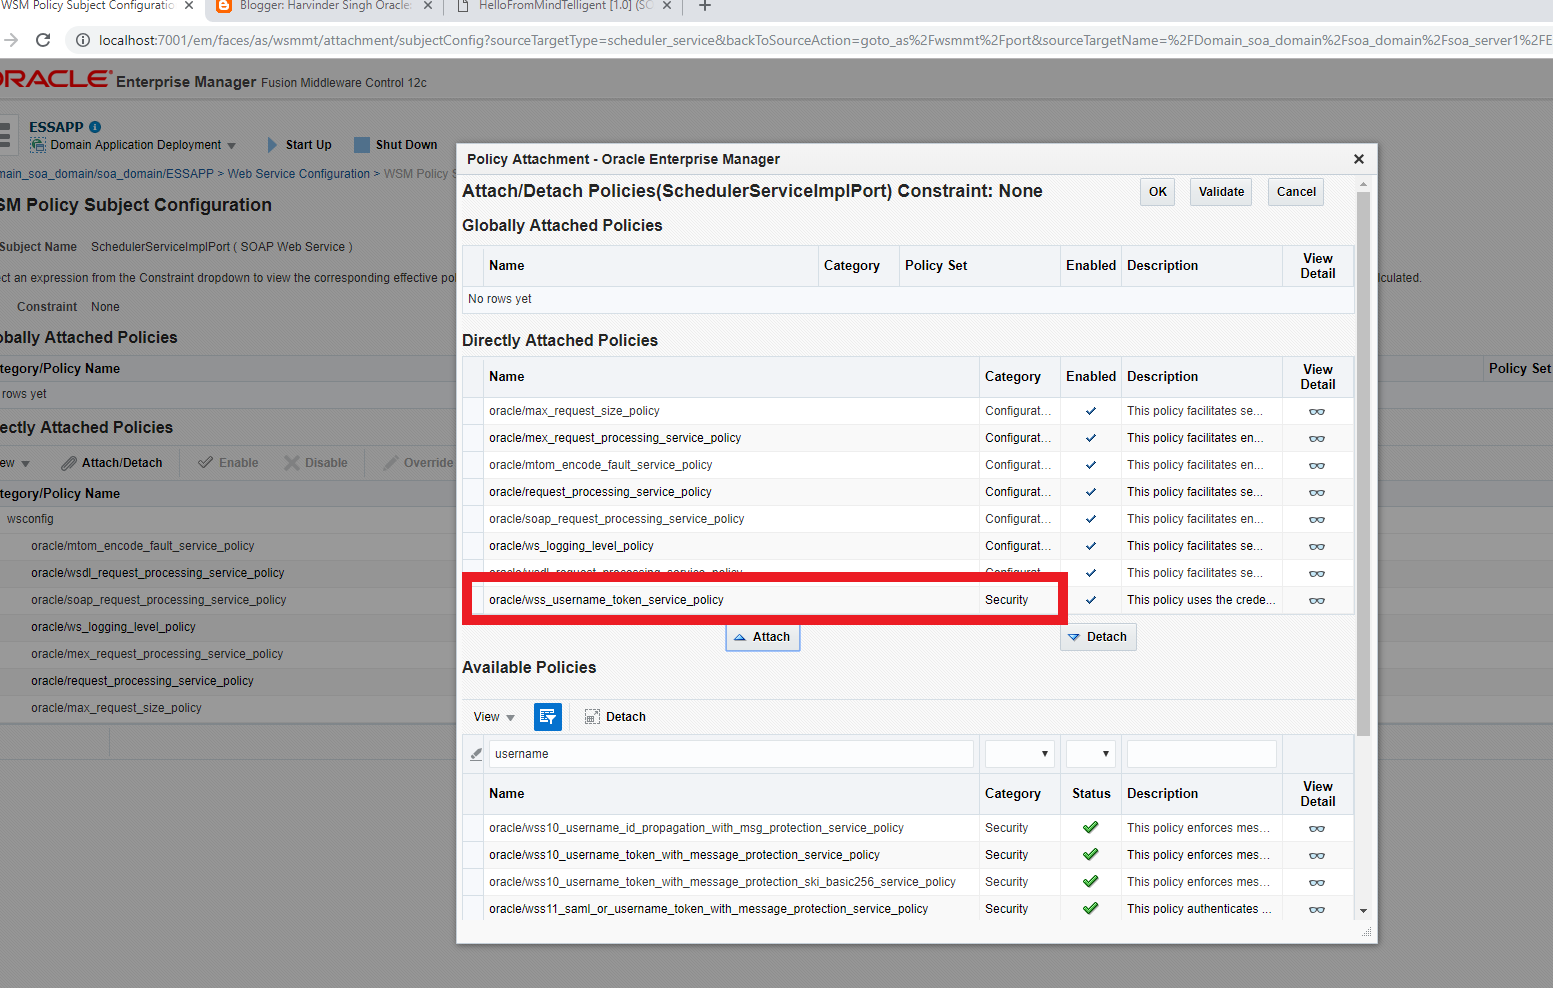
  • You should see the policy attached and enabled.


Create a SOA Composite to Submit a HelloFromHarvinderJOB


  • Create a new SOA Application/Project with an asynchronous BPEL (2.0) process, InvokeSchedulerJobMindTelligent, in JDeveloper 12c.
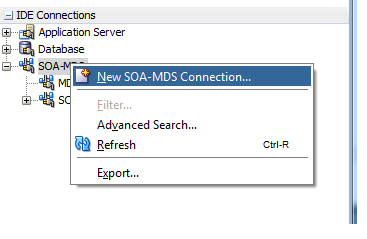
  •  Create a SOA_MDS connection.


  • In the BPEL process, add Schedule Job Activity.
  • Open Schedule Job Activity
  • Double click on Schedule Job Activity


  • Choose HelloFromMindtelligentJob
  • Set Start Time as current date time, and click OK.


  • You may see this pop up message.


  • Click “Yes” to continue. In the next several steps we will replace WSDL URL with concrete binding on the reference binding later to fix this.
  • In EM, go to Scheduling Services -> Web Services.


  • Click on link “SchedulerServiceImplPort”


  • Click on link “WSDL Document SchedulerServiceImplPort”.


  • It launches a new browser window displaying the ESSWebService wsdl. WSDL URL is in the browser address.


  • Update EssService WSDL URL.


  •  You need to attach WSM security policy to EssService request.


  • Add Security Policy: oracle/wss_username_token_client_policy.


  • Setting up the credential store for policy framework is beyond the scope of this blog. However, please ensure that CSF Map with valid credentials is attached. 

  • After the composite is deployed, run the composite and check the Flow. A JOB ID is created
<requestId xmlns:xsi="http://www.w3.org/2001/XMLSchema-instance" xmlns:xsd="http://www.w3.org/2001/XMLSchema" xsi:type="xsd:long">

606
</requestId>


  •  Go ESSAPP -> Job Requests -> Search Job Requests. Find Job 606. Job was executed successfully.


  • Click on the JOB Link


Summary

In this blog, we demonstrated how to set up a SOA web service ESS job and how to invoke ESS web service to submit a job request from BPEL process in SOA Suite 12c 12.2.1.3


SOA 12c 12.2.1.3. Send Error Notifications.


You can create error notification rules at the SOA Infrastructure or individual partition
level that cause an alert message to be triggered when specific fault criteria are met.

For example, you can create a rule that sends an alert if more than 10 errors occur in a
48 hour period.

The error notification rules provide the following benefits:

• An aggregated notification of faults occurring in the system.

• A scheduled-based notification system with a configurable re-occurrence interval. For example, send an alert every 24 hours if rule criteria are met.

• Rule-configured faults and notification channel specifications. When a fault policy is triggered, an email is sent. You can create fault notification rules at the following levels:

• SOA Infrastructure (for system-wide alerts) • Individual partition level (for alerts specific to that partition)

To create a Error Notification Rule, first create a scheduler


  • Login to Enterprise Manager , go to SOA-Infra, Right Click, Define Schedules


  • This will navigate to Schedules Page


  • Click on Create


  • Enter the name , display name ,package, Description, Frequency,Timezone, Start Date and click on OK.  Only /oracle/apps/ess/custom/soa package can be used to create SOA Error Notification Rules

  • This concludes Defining a Schedule. The next step is to create Error Notification Rules
  •  Navigate to  SOA-Infra and click on “Error Notification Rules”,


  • Click Create to create notification rule.


Oracle SOA 12c. 12.2.1.3. Auto Purge


Auto Purge


Auto Purge can be used to free up the database from the older data associated with flow instances, adapter reports and fault alerts.

·         Navigate to the SOA Infrastructure Menu and Right Click

·         Navigate to SOA Administration and then Auto Purge
·         


  •  Click on Auto Purge:-


  • ·         Click on Enable and then enter the Schedule for the job


  • ·         Click on Apply.


Tuesday, May 1, 2018

Oracle SOA 12c. ANT Scripts to compile and package SOA composites

When deploying SOA composites using ANT deployment scripts, if you are getting error

MDS-00503: The metadata path "{0}" does not contain any valid directories.

To fix this issue, please change the elements in the adf-config.xml 

<?xml version="1.0" encoding="windows-1252" ?>
<adf-config xmlns="http://xmlns.oracle.com/adf/config" xmlns:adf="http://xmlns.oracle.com/adf/config/properties"
            xmlns:sec="http://xmlns.oracle.com/adf/security/config">
  <adf:adf-properties-child xmlns="http://xmlns.oracle.com/adf/config/properties">
    <adf-property name="adfAppUID" value="KafkaLogging-1314"/>
  </adf:adf-properties-child>
  <sec:adf-security-child xmlns="http://xmlns.oracle.com/adf/security/config">
    <CredentialStoreContext credentialStoreClass="oracle.adf.share.security.providers.jps.CSFCredentialStore"
                            credentialStoreLocation="../../src/META-INF/jps-config.xml"/>
  </sec:adf-security-child>
  <adf-mds-config xmlns="http://xmlns.oracle.com/adf/mds/config">
    <mds-config xmlns="http://xmlns.oracle.com/mds/config">
      <persistence-config>
        <metadata-namespaces>
          <namespace path="/apps" metadata-store-usage="mstore-usage_2"/>
          <namespace path="/soa/shared" metadata-store-usage="mstore-usage_3"/>
        </metadata-namespaces>
        <metadata-store-usages>
          <metadata-store-usage id="mstore-usage_2">
            <metadata-store class-name="oracle.mds.persistence.stores.file.FileMetadataStore">
              <property name="metadata-path" value="C:/LocalMDS"/>
            </metadata-store>
          </metadata-store-usage>
          <metadata-store-usage id="mstore-usage_3">
            <metadata-store class-name="oracle.mds.persistence.stores.file.FileMetadataStore">
              <property name="partition-name" value="seed"/>
              <property name="metadata-path" value="C:/Oracle12-2-1-3/Middleware/Oracle_Home/soa/integration"/> 
            </metadata-store>
          </metadata-store-usage>
        </metadata-store-usages>
      </persistence-config>
    </mds-config>
  </adf-mds-config>
</adf-config>

C:/Oracle12-2-1-3/Middleware/Oracle_Home/soa/integration is the location of the integration directory inside JDEveloper 12c

LocalMDS: is the local MDS 

Monday, April 16, 2018

AIA 12c : Deployment Fails NoClassDefFoundError: Oracle/fabric/management/deployedcomposites/mbean/Status

When deploying AIA PIPs, if we encounter the error

"NoClassDefFoundError: Oracle/fabric/management/deployedcomposites/mbean/Status"

The reason is that the  fabric-runtime.jar is missing from the classpath.

Edit the aiaenv.sh and ensure that ${SOA_HOME}/soa/modules/oracle.soa.fabric_11.1.1/fabric-runtime.jar is in the classpath

To fix this

  • Open the file ${AIA_INSTANCE}/bin/aiaenv.sh

  • Check if the CLASSPATH has this included or not
${SOA_HOME}/soa/modules/oracle.soa.fabric_11.1.1/fabric-runtime.jar

If this is missing, backup and add that .jar to the CLASSPATH in that file and source the new aiaenv.sh
OR Exit out of aiaenv.sh file, Include/ADD that in CLASSPATH by using the export command
  ${SOA_HOME}/soa/modules/oracle.soa.fabric_11.1.1/fabric-runtime.jar

Wednesday, February 28, 2018

SpringBoot Externalization Part 1: Develop Externalization Server

Spring Boot lets you externalize your configuration so that you can work with the same application code in different environments. You can use properties files, YAML files, environment variables, and command-line arguments to externalize configuration. Property values can be injected directly into your beans by using the @Valueannotation, accessed through Spring’s Environment abstraction, or be bound to structured objects through @ConfigurationProperties.


This thread discusses connection of Spring Externalization Config Server and it caches the properties from Git Hub.

The properties files are in YAML format that are stored on GIT. 


 MindTelligentExternalizationApplication Server Configuration:


import org.springframework.boot.SpringApplication;
import org.springframework.boot.autoconfigure.SpringBootApplication;
import org.springframework.cloud.config.server.EnableConfigServer;

@EnableConfigServer
@SpringBootApplication
public class MindTelligentExternalizationApplication {

public static void main(String[] args) 
{
SpringApplication.run(MindTelligentExternalizationApplication .class, args);
}

}


Package the code with application.yml file:


server:
  port: 8888
spring:
  cloud:
    config:
      server:
        git:
          uri:  https://hsingh@github.com/ymlbranch
          searchPaths: src
          username: hsingh@MindTelligent.com

          password: XXXXXXXX 


Build the Code with Maven:


<?xml version="1.0" encoding="UTF-8"?>
<project xmlns="http://maven.apache.org/POM/4.0.0" xmlns:xsi="http://www.w3.org/2001/XMLSchema-instance"
    xsi:schemaLocation="http://maven.apache.org/POM/4.0.0 http://maven.apache.org/xsd/maven-4.0.0.xsd">
    <modelVersion>4.0.0</modelVersion>

    <groupId>com.mindtelligent.github.server</groupId>
    <artifactId>MindTelligentIotConfigurationService</artifactId>
    <version>0.0.1-SNAPSHOT</version>
    <packaging>jar</packaging>

    <parent>
        <groupId>org.springframework.boot</groupId>
        <artifactId>spring-boot-starter-parent</artifactId>
        <version>2.0.0.RELEASE</version>
        <relativePath /> <!-- lookup parent from repository -->
    </parent>

    <properties>
        <project.build.sourceEncoding>UTF-8</project.build.sourceEncoding>
        <java.version>1.8</java.version>
    </properties>

    <dependencies>
        <dependency>
            <groupId>org.springframework.cloud</groupId>
            <artifactId>spring-cloud-config-server</artifactId>
        </dependency>

        <dependency>
            <groupId>org.springframework.boot</groupId>
            <artifactId>spring-boot-starter-test</artifactId>
            <scope>test</scope>
        </dependency>
    </dependencies>

    <dependencyManagement>
        <dependencies>
            <dependency>
                <groupId>org.springframework.cloud</groupId>
                <artifactId>spring-cloud-dependencies</artifactId>
                <version>Finchley.M8</version>
                <type>pom</type>
                <scope>import</scope>
            </dependency>
        </dependencies>
    </dependencyManagement>

    <build>
        <plugins>
            <plugin>
                <groupId>org.springframework.boot</groupId>
                <artifactId>spring-boot-maven-plugin</artifactId>
            </plugin>
        </plugins>
    </build>

    <repositories>
        <repository>
            <id>spring-milestones</id>
            <name>Spring Milestones</name>
            <url>https://repo.spring.io/libs-milestone</url>
            <snapshots>
                <enabled>false</enabled>
            </snapshots>
        </repository>
    </repositories>


</project>


  • Once this is built. Run the JAR file with the command
java -jar MindTelligentIotConfigurationService-0.0.1-SNAPSHOT.jar

Log on to the browser and validate by:

http://hostname:8888/yml_file/default

You should be able to see the contents on the browser.


Saturday, February 3, 2018

Important Kafka Commands

Important Kafka Commands

MindTelligent has developed an open source Kafka Administration Framework. This framework monitors the health of Kafka And Zookeeper nodes. It also ships a bunch of important Kafka commands.


These commands can be executed from $KAFKA_HOME/bin directory


Command to Set the Kafka Topic retention Period for 10 days:


./kafka-topics.sh --zookeeper localhost:2181 --alter --topic mindtelligent_topic  --config retention.ms=864000000

Command to Set Kafka Kafka partitions to 6 :


./kafka-topics.sh --zookeeper localhost:2181 --alter --topic mindtelligent_topic --partitions 6

Command to View offsets for the Kafka Consumer Group and instances for a consumer group:


./kafka-consumer-groups.sh --bootstrap-server localhost:9092 --describe --group mindtelligent_topic_group


Command to list all Kafka Consumer Groups across all topics:

./kafka-consumer-groups.sh --bootstrap-server localhost:9092 --list


Command to set the Kafka Offset to earliest:


./kafka-consumer-groups.sh --bootstrap-server localhost:9092 --group mindtelligent_topic_group --reset-offsets --to-earliest --topic mindtelligent_topic --execute


Command to set the Kafka Offset to Latest:


./kafka-consumer-groups.sh --bootstrap-server localhost:9092 --group mindtelligent_topic_group --reset-offsets --to-latest --topic mindtelligent_topic --execute

List Kafka Topic:


./kafka-topics.sh --zookeeper localhost:2181 --list


Describe a Kafka Topic:


./kafka-topics.sh --zookeeper localhost:2181 --describe --topic mindtelligent_topic

Purge a Kafka Topic:


./kafka-topics.sh --zookeeper localhost:2181 --alter --topic mindtelligent_topic--config retention.ms=1000

Delete a Kafka Topic: 

./kafka-topics.sh --zookeeper localhost:2181 --delete --topic mindtelligent_topic

Get Number of Messages in a Kafka Toipc:


./kafka-run-class.sh kafka.tools.GetOffsetShell --broker-list localhost:9092 --topic mindtelligent_topic--time -1 --offsets 1 | awk -F ":" '{sum += $3} END {print sum}'


Get the earliest offset still in a topic:

./kafka-run-class.sh kafka.tools.GetOffsetShell --broker-list localhost:9092 --topic mindtelligent_topic  --time -2

Get the latest offset still in a topic:

./kafka-run-class.sh kafka.tools.GetOffsetShell --broker-list localhost:9092 --topic mindtelligent_topic --time -1


Friday, January 12, 2018

ForgeRock: Open AM. Install Open AM 5.5 with Tomcat 8.0 - Part 1- Install Tomcat

This BLOG thread discusses on steps to install and configure Open AM 5.5 with Tomcat 8.0.


  • Install Tomcat.

You can always find the latest stable version of Apache Tomcat 8 from its official download page, which is 8.0.33 as of writing.
    • Under the "Binary Distributions" section and then the "Core" list, use the link pointing to the "tar.gz" archive to compose a wget command: 


  • Execute the command 

sudo tar -zxvf apache-tomcat-8.5.24.tar.gz -C /opt/tomcat --strip-components=1


  • Prior to running Apache Tomcat, you need to setup proper permissions for several directories:

cd /opt/tomcat
sudo chgrp -R tomcat conf
sudo chmod g+rwx conf
sudo chmod g+r conf/*
sudo chown -R tomcat logs/ temp/ webapps/ work/

sudo chgrp -R tomcat bin
sudo chgrp -R tomcat lib
sudo chmod g+rwx bin
sudo chmod g+r bin/*


Monday, January 1, 2018

JDeveloper Composite deployment with SOA 2 way SSL with SHA256 certificates.

For SOA managed servers secured with SHA256 certificates and if SSL port is enabled, developers face an issue when deploying composites from JDeveloper. This issue is caused due to SSL Handshake Exception.

To resolve this issue:


  • Please ensure that you have the public root certificate chain in your cacerts trust store.
  • Please edit the jdev.conf files in the $JDEV HOME/jdev/bin directory and add the property
AddVMOption -Dweblogic.security.SSL.enableJSSE=true 


  • Restart JDeveloper and you will see the deployment issue is resolved.

OCI Knowledge Series: OCI Infrastructure components

  Oracle Cloud Infrastructure (OCI) provides a comprehensive set of infrastructure services that enable you to build and run a wide range of...