Configuring an OID Authentication Provider in WebLogic 10.3.6

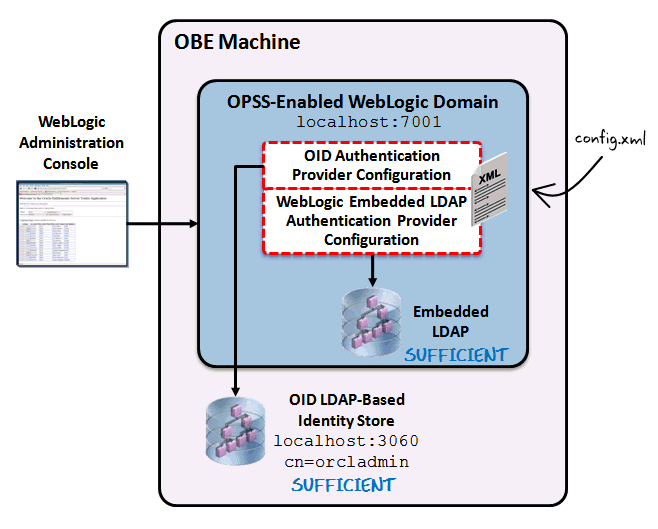
This is the architecture that depicts the configuration of an OID LDAP-based authentication provider used by OPSS applications deployed on a WebLogic Server environment.
Follow the steps below to configure an OID authentication provider using the Weblogic Administration Console:
| 1. | Open the Firefox web browser using the  icon on the launch panel. Make sure the WebLogic Server is running before continuing on to the next step. icon on the launch panel. Make sure the WebLogic Server is running before continuing on to the next step. | |||||||||||||||||||||||||||||||||||||||||||||||||||||||||||||||||||||
|---|---|---|---|---|---|---|---|---|---|---|---|---|---|---|---|---|---|---|---|---|---|---|---|---|---|---|---|---|---|---|---|---|---|---|---|---|---|---|---|---|---|---|---|---|---|---|---|---|---|---|---|---|---|---|---|---|---|---|---|---|---|---|---|---|---|---|---|---|---|---|
| 2. | Open the WebLogic Administration Console by browsing to http://localhost:7001/console. Login using the following credentials: Username: weblogic Password: welcome1  | |||||||||||||||||||||||||||||||||||||||||||||||||||||||||||||||||||||
| 3. | Click the Security Realms link in the Domain Structure pane to show the list of security realms for the domain. | |||||||||||||||||||||||||||||||||||||||||||||||||||||||||||||||||||||
| 4. | Click the myrealm link in the Realms pane to show the settings for the domain's security realm. | |||||||||||||||||||||||||||||||||||||||||||||||||||||||||||||||||||||
| 5. | Click the Providers tab to show the security providers configured for myrealm. | |||||||||||||||||||||||||||||||||||||||||||||||||||||||||||||||||||||
| 6. | Click the Authentication tab to list the currently configured authentication providers for this domain's security realm. The default out-of-the-box providers are shown for the embedded LDAP authentication provider and identity asserter. This is where you configure the new OID authentication provider. | |||||||||||||||||||||||||||||||||||||||||||||||||||||||||||||||||||||
| 7. | Click New to create a new authentication provider for this domain. | |||||||||||||||||||||||||||||||||||||||||||||||||||||||||||||||||||||
| 8. | The Create a new Authentication Provider page is displayed. Give your new authentication provider a name, such as OID Authenticator, select the type called OracleInternetDirectoryAuthenticator, and click OK. | |||||||||||||||||||||||||||||||||||||||||||||||||||||||||||||||||||||
| 9. | You should now see your new OID authenticator in the list of authentication providers, at the bottom of the list. | |||||||||||||||||||||||||||||||||||||||||||||||||||||||||||||||||||||
| 10. | Click the link for your OID authentication provider to configure its settings. | |||||||||||||||||||||||||||||||||||||||||||||||||||||||||||||||||||||
| 11. | The Settings for OID Authenticator is displayed. Click the Provider Specific tab to configure the detailed settings for this provider. | |||||||||||||||||||||||||||||||||||||||||||||||||||||||||||||||||||||
| 12. | This step guides you through all of the settings for configuring your new OID authentication provider. All the settings are made on a single configuration page, however we go through them one section at a time in this instruction. The first section contains the Connection settings for the OID server. Use the values from the table below for this section:
 The next section contains the Users settings for the OID provider. Use the values from the table below for this section:
 The next section contains the Groups settings for the OID provider. Use the values from the table below for this section:
 Click Save to persist your changes.  | |||||||||||||||||||||||||||||||||||||||||||||||||||||||||||||||||||||
| 13. | Click the Common tab in the Settings for OID Authenticator pane to show settings common to all authentication providers. | |||||||||||||||||||||||||||||||||||||||||||||||||||||||||||||||||||||
| 14. | Change the Control Flag setting to SUFFICIENT and click Save. This setting allows this provider to participate in the authentication process without requiring the user to be in its identity store. | |||||||||||||||||||||||||||||||||||||||||||||||||||||||||||||||||||||
| 15. | Click the Providers link the breadcrumb displayed near the top of the page to quickly navigate back to theAuthentication Providers page. | |||||||||||||||||||||||||||||||||||||||||||||||||||||||||||||||||||||
| 16. | Click the DefaultAuthenticator link to display its common settings so you can change its control flag toSUFFICIENT as well. | |||||||||||||||||||||||||||||||||||||||||||||||||||||||||||||||||||||
| 17. | Change the Control Flag setting to SUFFICIENT and click Save. This setting allows this provider to participate in the authentication process without requiring the user to be in its identity store. | |||||||||||||||||||||||||||||||||||||||||||||||||||||||||||||||||||||
| 18. | Click the Providers link the breadcrumb displayed near the top of the page to quickly navigate back to theAuthentication Providers page. | |||||||||||||||||||||||||||||||||||||||||||||||||||||||||||||||||||||
| 19. | Click Reorder to change the order of your configured authentication providers. If you remember from the OPSS Concepts self-study course, OPSS obtains its authentication configuration from the authentication provider configuration found in the WebLogic Server domain. It also states that OPSS first looks at all of the LDAP-based authentication providers in the list, and chooses the first one in the list with the highest control flag setting. Because we configured both LDAP-based authentication providers to use the SUFFICIENTcontrol flag setting, OPSS would use the default authenticator if we left the configuration as it is now. In order to ensure that OPSS recognizes your new OID authenticator as its authentication provider, you must reorder your list of authentication providers so that the OID authentication provider is first in the list.  | |||||||||||||||||||||||||||||||||||||||||||||||||||||||||||||||||||||
| 20. | Select the OID Authenticator and use the arrows on the right to move it into the first position. Click OK. |


