Saturday, February 26, 2011

Validating Authentication and Authorization in an Oracle Access Manager Application Domain : Part 1

MindTelligent, Inc.  is Oracle Technologies focused corporation based in El Dorado Hills, CA.

This tutorial elucidates the steps involve in several methods for confirming that Agent registration
and authentication and authorization policies are operational. The procedures are
nearly identical for both OAM Agents and OSSO Agents (mod_osso). However, OSSO
Agents use only the authentication policy and not the authorization policy.

Prerequisites

  • Users and groups who are granted access must exist in the primary LDAP User Identity Store that is registered with OAM 11g
  • Agents must be registered to operate with OAM 11g. After registration, protected resources should be accessible with proper authentication without restarting the Administration or Managed Server.
  • Application domain, authentication policies, and authorization policies must be configured.

To verify authentication and access


  1. Using a Web browser, enter the URL for an application protected by the registered Agent to confirm that the login page appears (proving that the authentication redirect URL was specified appropriately). For example: http://myWebserverHost.us.abc.com:8100/resource1.html
  2. Confirm that you are redirected to the login page.
  3. On the Sign In page, enter a valid username and password when asked, and click Sign In.
  4. Confirm that you are redirected to the resource and proceed as follows:
  •  Success: If you authenticated successfully and were granted access to the resource; the configuration is working properly.
  • Failure: If you received an error during login or were denied access to the resource, check the following:
            – Authentication Failed: Sign in again using valid credentials.
            – Access to URL ... denied: This userID is not authorized to access this resource.
            – Resource not Available: Confirm that the resource is available.
            – Wrong Redirect URL: Verify the redirect URL in the Administration

For questions, comments and feedback  please contact:
 Harvinder Singh Saluja

Thursday, February 17, 2011

Setting up the Keystore for Message Protection

Setting up the Keystore for Message Protection

In order to sign and encrypt SOAP messages you must first create and configure the Web Services Manager Keystore for a WebLogic domain. This keystore is used to store public and private keys for SOAP messages within the WebLogic Domain. The default key store is called "./default-keystore.jks" and can be found in the $MIDDLEWARE_HOME/user_projects/domain/base_domain/config directory. The Oracle Web Services Manager (OWSM) does not use the WebLogic Server keystore that is used for SSL (DemoTrust.jks/DemoIdentity.jks). Instead, it has it's own keystores defined and default is default-keystores.jks

  • The signature and encryption keys are used to sign, verify, encrypt, and decrypt the SOAP messages.
  • The keystore configuration is domain wide: all Web services and Web service clients in the domain use this keystore.

To set up the keystore used by Web Services Manager follow these steps:
  1. Using Fusion Middleware Control, click WebLogic Domain, then Security, and then Security Provider Configuration.
    Click the plus sign (+) to expand the Keystore control near the bottom of the page, then click Configure.

  2. Use the keytool to create a Java keystore, using the following steps 
    1. Create a new private key and self-signed certificate. Use the genKey command to create a private key. It will create a new private key if one does not exist. The following command generates an RSA key, with RSA-SHA1 as the signature algorithm, with the alias test in the test.jks keystore.
      keytool -genkey -alias mindtelligent -keyalg "RSA" -dname "CN=mindtelligent-d, dc=us,dc=mindtelligent,dc=com" -keystore mindtelligent.jks
      The keytool utility prompts for the needed key and keystore passwords. DSA key is not supported. Make sure you pass the parameter " -keyalg RSA " in the command.
    2. Display the keystore.
      The following command displays the contents of the keystore. It will prompt you for the keystore password.
      keytool -list -v -keystore test.jks
    3. Import a trusted CA certificate in the keystore.
      Use the -import command to import the certificate. The following command imports a trusted CA certificate into the test.jks keystore. It will create a new keystore if one does not exist. The keytool utility prompts for the needed password.
      keytool -import -alias aliasfortrustedcacert -trustcacerts -file trustedcafilename -keystore test.jks
    4. Generate a certificate request.
      Use the -certreq command to generate the request. The following command generates a certificate request for the test alias. The CA will return a certificate or a certificate chain.
      keytool -certreq -alias test -sigalg "RSAwithSHA1" -file certreq_file -storetype jks -keystore test.jks
    5. Replace the self-signed certificate with the trusted CA certificate.
      You must replace the existing self-signed certificate with the certificate from the CA. To do this, use the -import command. The following command replaces the trusted CA certificate in the test.jks keystore. The keytool utility prompts for the needed password.
      keytool -import -alias test -file trustedcafilename -keystore test.jks

Tuesday, February 15, 2011

OID (Oracle Internet Directory) and Oracle SOA Suite Integration

On a recent SOA/OIM engagement, MindTelligent team was assigned a task of integrating the SOA 11.1.1.3 suite with Oracle Internet Directory. Weblogic Fusion Middleware/SOA Suite typical install comes with an embedded LDAP Server as "Authentication Provider". The objective is to integrate multiple "Authentication Providers" such as Active Directory or Oracle Internet Directory

Before we tread further, a few important points:

The Control Flag determines how the login sequence uses the Authentication provider.
  • A REQUIRED value specifies this LoginModule must succeed. Even if it fails, authentication proceeds down the list of LoginModules for the configured Authentication providers.
  • A REQUISITE value specifies this LoginModule must succeed. If other Authentication providers are configured and this LoginModule succeeds, authentication proceeds down the list of LoginModules. Otherwise, control is return to the application.
  • A SUFFICIENT value specifies this LoginModule need not succeed. If it does succeed, return control to the application. If it fails and other Authentication providers are configured, authentication proceeds down the LoginModule list.
  • An OPTIONAL value specifies this LoginModule need not succeed. Whether it succeeds or fails, authentication proceeds down the LoginModule list. This setting is the default.
Steps to integrate OID/OIM With SOA Suite


  • Log into the Weblogic Admin Console http://hostname:7001/console
  • Click on Security Realms-->myrealm. Click on myrealm. You should see the screen as below.
  •  Click on Providers. This will take you to the next screen showing the "Authentication Providers"

  • Click on the Default Authentication Provider and change the control flag to "SUFFICIENT"

  • Click Save to save changes.
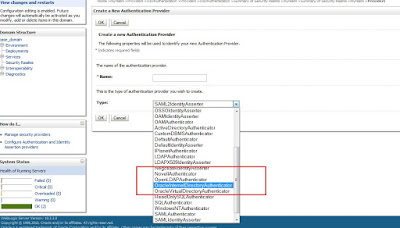
  • Click on "New" To add new authentication provider
  • Choose Oracle Internet Directory Type 


  •  For Name, put OIDAuthentication.
  • Click on the Provider Specific and Add the OID specific information.


  • Create a Group in OID called Administrators OR Monitors OR Deployers and add a user to this group to test.

For questions, comments and feedback  please contact:
 Harvinder Singh Saluja


      Monday, February 7, 2011

      OC4J Support for Secured Socket Layer

      OC4J supports Secure Socket Layer (SSL) communication between Oracle
      HTTP Server and OC4J in an Oracle Application Server environment, using
      secure AJP. This is the secure version of Apache JServ Protocol, the protocol
      that Oracle HTTP Server uses to communicate with OC4J.
      This tutorial focuses on:
      • Overview of SSL Keys and Certificates
      • Using Keys and Certificates with OC4J and Oracle HTTP Server
      • Enabling SSL in OC4J
      • Requesting Client Authentication
      • Resolving Common SSL Problems
      Overview of SSL Keys and Certificates

      In SSL communication between two entities, such as companies or
      individuals, the server has a public key and an associated private key.
      Each key is a number, with the private key of an entity being kept secret
      by that entity, and the public key of an entity being publicized to any other
      parties with which secure communication might be necessary.

      The security of the data exchanged is guaranteed by keeping the private
      key secret, and by the complex encryption algorithm. This system is
      known as asymmetric encryption, because the key used to encrypt data is
      not the same as the key used to decrypt data.

      Asymmetric encryption has a performance cost due to its complexity. A
      much faster system is symmetric encryption, where the same key is used
      to encrypt and decrypt data. But the weakness of symmetric encryption is
      that the same key has to be known by both parties, and if anyone
      intercepts the exchange of the key, then the communication becomes
      insecure.

      SSL uses both asymmetric and symmetric encryption to communicate. An
      asymmetric key (PKI public key) is used to encode a symmetric encryption
      key (the bulk encryption key); the bulk encryption key is then used to
      encrypt subsequent communication. After both sides agree on the bulk
      encryption key, faster communication is possible without losing security
      and reliability.

      When an SSL session is negotiated, the following steps take place:
          1. The server sends the client its public key.
          2. The client creates a bulk encryption key, often a 128 bit RC4 key, using a specified encryption suite.
          3. The client encrypts the bulk key with the server's public key, and sends the encrypted bulk key to the 
             server.
          4. The server decrypts the bulk encryption key using the server's private key.
          5. This set of operations is called key exchange. After key exchange has taken place, the client and the
              server use the bulk encryption key to encrypt all exchanged data.

      • In SSL the public key of the server is sent to the client in a data structure
        known as an X.509 certificate. This certificate, created by a certificate
        authority (CA), contains, a public key, information concerning the owner of
        the certificate, and optionally some digital rights of the owner. Certificates
        are digitally signed by the CA, which created them using that CA's digital
        certificate public key.

      • In SSL, the CA's signature is checked by the receiving process to ensure
        that it is on the approved list of CA signatures. This check is sometimes
        performed by analysis of certificate chains. This occurs if the receiving
        process does not have the signing CA's public key on the approved list. In
        that case the receiving process checks to see if the signer of the CA's
        certificate is on the approved list or the signer of the signer, and so on.
        This chain of certificate, signer of certificate, signer of signer of certificate,
        and so on is a certificate chain. The highest certificate in the chain (the
        original signer) is called the root certificate of the certificate chain.
      • The root certificate is often on the approved list of the receiving process.
        Certificates in the approve list are called trust points or trusted certificates.
        A root certificate can be signed by a CA or can be self-signed, meaning
        that the digital signature that verifies the root certificate is encrypted
        through the private key that corresponds with the public key that the
        certificate contains, rather than through the private key of a higher CA.
        (Note that certificates of the CAs themselves are always self-signed.)

      SDFC (Salesforce.Com) integration with Oracle Fusion Middleware and SOA SUITE

      While on a recent assignment, a task assigned to MindTelligent team was to integrate SDFC (Salesforce.com) services with Oracle Application 11i and R12 using Oracle SOA suite 11g 11.1.1.3 and Fusion Middleware 10.3.3.  For composites, trying to access the Salesforce services deployed in SFDC.com, we need to configure the Weblogic Fusion Middleware to be able to access the services outside the firewall. Also, we need to add Salesforce certificates.

      The first and foremost step is to configure the Weblogic/ Oracle SOA domain  to access remote Salesforce services.

      For SOA composites deployed on Oracle 11g version 11.1.1.3, to consume web services the following changes need to be made to the setSOADomainEnv.sh on Linux  OR  setSOADomainEnv.cmd file. This section will discuss the Linux deployments only.

      The setSOADomainEnv.sh can be found in the directory $WL_HOME/user_projects/domains/base_domain/bin.

      The  EXTRA_JAVA_PROPERTIES variables needs to be modified as follows

      EXTRA_JAVA_PROPERTIES="${EXTRA_JAVA_PROPERTIES} -Dhttps.proxySet=true -Dhttps.proxyHost=localdomain.com -Dhttps.proxyPort=443 -Dhttp.nonProxyHosts=localhost.localdomain|127.0.0.1|192.168.1.7"

      export EXTRA_JAVA_PROPERTIES

      https.proxyHost: Your proxy Host
      https.proxyPort:   Your proxy port, 443 is the default port for https
      http.nonProxyHosts: Your non proxy servers, the list can be separated with a "|"


      The second most significant step is to install and configure the https://login.salesforce.com certificates

      Download the certificates from https://login.salesforce.com and import the certificates using the
      Java Keytool

      keytool -importcert -alias login.salesforce.com -file login.salesforce.com  -keystore mykeysotre.jks

      Configure the jks in the setSOADomain.sh.


      After the changes have been made, restart the Admin Weblogic Server and Managed SOA Server.


      For questions, comments and feedback  please contact:
       Harvinder Singh Saluja

      Thursday, February 3, 2011

      Oracle Service Bus Security using OWSM: Create Service Accounts Part 1

      Service Accounts

      A service account provides a user name and password that proxy services and business services use for outbound authentication or authentication to a local or remote resource, such as an FTP server or a JMS server. For example, if a business service is required to supply a user name and password for transport-level authentication with a Web Service, you create a service account that specifies the user name and password, then you configure the business service to include the service-account credentials in its outbound requests.
      The user names and passwords that you enter in service accounts are used for outbound authentication or for providing credentials to local or remote resources. The user names and passwords that you enter in the Security Configuration module of the Oracle Service Bus Console are used for inbound authentication and for authenticating administrative requests.

      Adding Service Accounts

      1. If you have not already done so, click Create to create a new session or click Edit to enter an existing session.  
      2. Select Project Explorer, then select a project or folder in which to add the service account. The Project/Folder View page is displayed.
      3. From the Create Resource drop-down list, select Service Account to display the Create a New Service Account page

      1. In the Resource Name field, enter a unique name for this service account.
      2. In the Resource Description field, enter a description for the service account.
      3. Under Resource Type, do one of the following:
        • To create a service account that provides the user names and passwords that it receives from incoming client requests, select Pass Through.
        • To create a service account that provides a user name and password that you save with the service account configuration, select Static.
        • To create a service account that maps the user name from one or more authenticated clients to user names and passwords that you specify, select Mapping.

      Wednesday, February 2, 2011

      How to reset the OIM password without using the Identity Manager UI

      Typically the ODSM (Oracle Directory Services Manager) allows the user to change the passwords using the url http://hostname:7005/odsm . There are situations where one needs to change the password via a Java Web Service. This Post uses the OID (Oracle Internet Directory) Java API to reset password information.


      import java.io.InputStream;
      import java.util.Hashtable;
      import java.util.Properties;
      import javax.naming.Context;
      import javax.naming.NamingException;
      import javax.naming.directory.InitialDirContext;
      import javax.naming.ldap.InitialLdapContext;

      import oracle.ldap.util.AuthFailureException;
      import oracle.ldap.util.LDIF;
      import oracle.ldap.util.ModPropertySet;
      import oracle.ldap.util.RootOracleContext;
      import oracle.ldap.util.User;
      import oracle.ldap.util.Util;
      import oracle.ldap.util.UtilException;
      import oracle.ldap.util.Subscriber;

      public class OIDAuthenticate implements OIDConstants {
          public OIDAuthenticate() {
              super();
          }
        
              public String oidResetPassword(String userId,
                     String password) throws OIDException {
              InitialDirContext ctx = null;
              try {
                  ctx = getOIDConnection();
                  RootOracleContext roc = null;
                  Subscriber sub = null;
                  User user = null;
                  roc = new RootOracleContext(ctx);
                  try {
                      sub = roc.getSubscriber(ctx,util.IDTYPE_DEFAULT, 
                            null, new String[] { "*" });
                  } catch (UtilException ue) {
                      OIDException le =
                          new OIDException(ue.getLDAPErrorCode() + "", 
                          ue.getMessage());
                      le.printStackTrace();
                  }            try {
                      user =
                       sub.getUser(ctx, Util.IDTYPE_SIMPLE, 
                       userId, new String[] { "*" });
                  } catch (UtilException e) {
                      OIDException le =
                          new OIDException(e.getLDAPErrorCode() + "", 
                          e.getMessage());
                      le.printStackTrace();
                  }

                  ModPropertySet mps = new ModPropertySet();
                  mps.addProperty(LDIF.ATTRIBUTE_CHANGE_TYPE_REPLACE,
                       "userpassword",password);
                  user.setProperties(ctx, mps);
                  return STR_SUCCESS;
              } catch (Exception e) {
                  System.out.println("Problem resetting password: ");
                  e.printStackTrace();
                  return "EXCEPTION_OCCURED";
              }finally
              {   
                try {
                    if(ctx!=null) ctx.close();
                } catch (NamingException ue) {
                    throw new OIDException("ERR", ue.getMessage());
                }
              } 
          }
          public InitialDirContext getOIDConnection() throws OIDException{
              InitialDirContext ctx;

              try {
                  Hashtable env = new Hashtable();
                  env.put(Context.INITIAL_CONTEXT_FACTORY,
                          "com.sun.jndi.ldap.LdapCtxFactory");
                  env.put(Context.SECURITY_AUTHENTICATION, "simple");
                  env.put(Context.SECURITY_PRINCIPAL, "cn=orcladmin");
                  env.put(Context.SECURITY_CREDENTIALS, "password1");
                  env.put(Context.PROVIDER_URL,               
                                             "ldap://hostname:3060/");
                  env.put(Context.REFERRAL, "follow");

                  ctx = new InitialLdapContext(env, null);

                  return ctx;
              } catch (NamingException ne) {
                  throw new OIDException("EXCEPTION_!", 
                                          ne.getMessage());  
              }
          }
      }

      For questions, comments and feedback,  please contact:
       Harvinder Singh Saluja

      Use SSH Keys to clone GIT Repository using SSH

        1. Generate a New SSH Key Pair bash ssh-keygen -t rsa -b 4096 -C "HSingh@MindTelligent.com" -t rsa specifies the type of key (...