Wednesday, November 8, 2017

ForgeRock IAM : OpenDS (Open Directory Server). Importing LDIF files

The most efficient method of importing LDIF data is to take the OpenDJ server offline. Alternatively, you can schedule a task to import the data while the server is online.


Importing from LDIF overwrites all data in the target backend with entries from the LDIF data.


In this thread, i am using cygwin to import the Data into OpenDS. Open DS is running on Widows server.


./import-ldif.bat --hostname "Mindtelligent-T7EJ1A7" --port 4444 --bindDN "cn=Directory Manager" --bindPassword password --backendID userRoot --includeBranch dc=example,dc=com --ldifFile c:\\Users\\hsing\\Downloads\\Example.ldif  --trustAll


I use Apache Directory Server validate if import is successful. 


Wednesday, October 18, 2017

Oracle Event Hub Cloud Service: Oracle Kafka Solution

Oracle Event Hub Cloud Service delivers the power of Kafka as a managed streaming data platform integrated into the Oracle Cloud ecosystem. Create Topics and start streaming or manage and deploy your own Dedicated Kafka Cluster with Elastic Scalability.
Perform the following steps to create an Oracle Event Hub Cloud Service - Topic instance. You can skip this section, if you already have an Oracle Event Hub Cloud Service - Topic instance and plan to use that for this demo.
  1. Log in to your Oracle Event Hub Cloud Service - Topic account.
  2. In the Services page, click Create Service.
  3. The Create Service screen appears. Provide the following details and click Next.
    • Service Name: topicdemo
    • Service Description: Example to demo topic
    • Hosted On: platformdemo
    • Number of Partitions: 2
    • Retention Period (Hours): 24
    Service page of Create Service wizard
     
    Note: The platformdemo is the name of the Oracle Event Hub Cloud Service - Platform cluster in which the topic will be created. You can provide a different name if you want to host this in a different Oracle Event Hub Cloud - Platfrom cluster.
  4. In the Confirm page, if you find the details appropriate, click Create.
    Confirmation page of Create Service wizard
     
  5. The control returns to the Services page. In the Services page, you could now see the new topicdemo service listed.
    Services page
     
  6. Click on the Event Hub icon adjacent to the topicdemo instance to go to the Service Overview page.
  7. In the Service Overview page, observe the Topic field. This is the name of the Topic service that will be used in programs demonstrated in this tutorial.
    Service Overview page
     

References: Oracle Technetwork


Monday, October 16, 2017

Apache Kafka and Apache Spark: A "Data Science Match" made in heaven.

Kafka is a publish-subscribe messaging system that provides a reliable Spark Streaming
source. The Kafka project introduced a new consumer API between versions 0.8 and 0.10, so there are 2 separate corresponding Spark Streaming packages available. The API provides one-to-one mapping between Kafka's partition and the DStream generated RDDs partition along with access to metadata and offset.


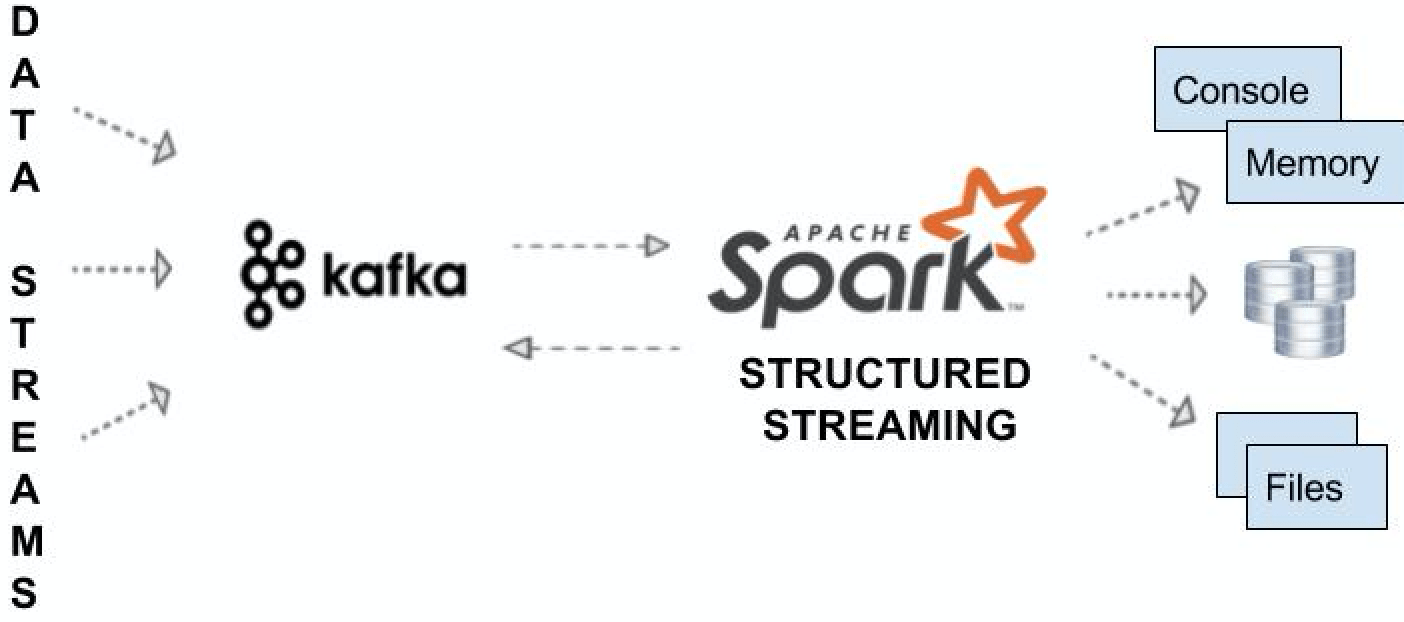
The following diagram shows end-to-end integration with Kafka, consuming messages from it, doing simple to complex windowing ETL, and pushing the desired output to various sinks such as memory, console, file, databases, and back to Kafka itself.


An overview of what our end-to-end integration will look like.


Following set of properties will need to be added to Spark Streaming API to integrate Kafka with Spark as a Source

bootstrap.servers: This describes the host and port of Kafka server(s) separated by a comma.

key.deserializer: This is the name of the class to deserialize the key of the messages from Kafka.

value.deserializer: This refers to the class that deserializes the value of the message.

group.id: This uniquely identifies the group of consumer.

auto.offset.reset: This is used messages are consumed from a topic in Kafka, but does not have initial offset in Kafka or if the current offset does not exist anymore on the server then one of the following options helps.


Friday, June 30, 2017

SOA Cloud 12c GIT Repository

When a project is created, you can choose to initialize the project with one project Git repository for the project. A Maven repository is also created. If required, you can add more project Git repositories, external Git repositories, import Git repositories, and configure auto-cleanup of the to the project Maven repository.


This BLOG discusses steps to create the GIT repository :- 

  • Login to the Oracle Developer Cloud Services and Select Create New Project.


  • Click Next


  • Choose the option to create a Empty Project
  • Choose Wiki Markup as Mark Down


  • A few seconds of provisioning later the Project will be accessible – navigate to the Code Section of the Developer Services Project and hit the New Repository button. This will start the process to create a new git repository. Make sure not to initialize it, but simply create an Empty Repository.


  • Project successfully created
  • The Next Step is to create a GIT Repository
  • Enter the Name and Description
  • Choose the option to create "Empty Repository"
  • Click Create


Wednesday, June 7, 2017

Calling Oracle SOA Cloud REST service from SOAP UI

On creating a SOAPUI project using the WADL, for a REST Service deployed on SOACLD. The WADL import process throws an SSL handshake exception.

This exception can be resolved by adding the following properties to the SOAPUI VM.


  • Navigate to the directory 
<SOAPUI_HOME>\ bin\SoapUI-5.3.0.vmoptions    

For Example: 
C:\Program Files\SmartBear\SoapUI-5.3.0\bin\SoapUI-5.3.0.vmoptions


  • Edit the file and add

-Dweblogic.security.SSL.minimumProtocolVersion=TLSv1.0
-Dsoapui.https.protocols=SSLv3,TLSv1.2


  • Restart SOAPUI and the issue will be resolved

Monday, June 5, 2017

SOA 12.2.1. View SOAP Header information.

Default SOA settings do not allow to view SOAP message (header & body)out-of-the-box on the EM Console or in the logs.

In order to see these SOAP conversations for a SOA composite service you can follow below steps: Please note the log file to be checked is OWSM

  • Using the Enterprise Manager, attach the management policy named oracle/log_policy to the webservice reference to which the SOAP headers needs to be monitored. 

  • Restart the composite

  • Check the below log file to view the SOAP messages whenever the webservice call is made.$DOMAIN_HOME/domain_name/servers/mserver_name/logs/owsm/msglogging/diagnostic.log


Monday, May 22, 2017

Oracle SOA Cloud: Deploy MDS Artifacts on SOA Cloud Instance using cloud Enterprise Manager

This BLOG thread discusses the steps on deployment of MDS artifacts on SOA cloud instance.

Setup JDeveloper SOA_DesignTimeRepository

JDeveloper 12.2.1 or 12.2.1.2 by default creates the SOA_DesignTimeRepository. This is a file based repository. At MindTelligent, we link this directory to SVN or GIT master repository. It is imperative that we have a main folder /apps and all the artifacts are stored under the apps folder.

On looking at the Design Time Repository closely, the structure looks like as shown below:


To change the location of the directory, simply right click on the  SOA_DesignTimeRepository, and click on Properties.


Please click on the Browse button and choose the folder you wish to select as File based Repository
Please note that you do not select the /apps folder under which all the artifacts are located.


That is it for JDeveloper Setup. You are ready to build your composites.


Deploy the MDS artifacts on SOA cloud


  • Log in to your SOA Cloud Instance 
  • Navigate to the "SOA Fusion Middleware Control Console"


  • Navigate to SOA Infrastructure-->Administration-->MDS configuration


Choose the option to Import the MDS


Please navigate to the folder where the Zip file for the SOA_DesignTimeRepository is located. 

The zip file SHOULD include the /apps folder


EM will display the following message if all the artifacts are successfully uploaded to the  MDS:


Friday, May 5, 2017

Installation of Apache Spark on Windows 10

Apache Spark is an open-source cluster-computing framework. Originally developed at the University of California, Berkeley's AMPLab, the Spark codebase was later donated to the Apache Software Foundation, which has maintained it since. Spark provides an interface for programming entire clusters with implicit data parallelism and fault-tolerance.

Please follow following instructions on installation Apache Spark on Windows 10.

Prerequisites:

Please ensure that you have installed JDK 1.8 or above on your environment.

Steps:

Installation of Scala 2.12.2
  • Please Install Scala after downloading it. 
  • Scala can be downloaded from here.
  • Download will give you a .msi file. Follow instructions and install Scala


Installation of Spark


  • Spark Can be downloaded from here
  • I am choosing version 2.1.1 prebuit for Hadoop. Please note, I shall be running this without Hadoop.


  • Extract the tar file into a folder called c:\Spark
  • The contents of the Extract will look like


Download Winutils


  • Download Winutils from these links : 64 bits
  • Create a folder c:\Spark\Winutils\bin and copy this winutils.exe there
  • The folder structure will look like


Setup Environment Variables


  • Following environment variables will need to be setup:
    • JAVA_HOME: C:\jdk1.8.0_91
    • SCALA_HOME: C:\Program Files (x86)\scala\bin
    • _JAVA_OPTION: -Xms128m -Xmx256m
    • HADOOP_HOME:  C:\Spark\WinUtils
    • SPARK_HOME: C:\Program Files (x86)\scala\bin
  • Create a folder c:\tmp\hive and give it read/write/execute privileges for all
Test Spark Environment

  • Navigate to SPARK_HOME/bin and execute command scala-shell
You should re ready to use Spark


Thursday, February 23, 2017

SOA 12c: How to remove folder and Files from MDS

The folder or individual files can be removed from SOA using WLST scripts. WLST scripts can also be used for deployment of MDS. Enterprise Manager can also be used to export and import the MDS.

Please click here to see how to use Enterprise Manager to import and export MDS

However, for deletion, please refer to following steps

On the FMW server, navigate to #ORACLE_COMMON/bin
cd ${ORACLE_HOME}/oracle_common/common/bin


Execute wlst.sh file:
wlst.sh


Give the command
connect('weblogic','password','t3://WeblogicHost:7001') //Please use the Weblogic Admin Server Port here.


Give The Command to remove a specific folder. This command will remove the /app/Test folder.
sca_removeSharedData(' http://soaHost:ManagedServerPort','Test')

sca_removeSharedData(' http://localhost:8001','Test')

You should see following message:


wls:/soainfra/serverConfig/> sca_removeSharedData(' http://localhost:8000','Test')
serverURL =  http://localhost:8000
folderName = Test
user = None
INFO: Creating HTTP connection to host:localhost, port:8000
Enter username and password for realm 'default' on host localhost:8000
Authentication Scheme: Basic
Username: weblogic
Password:
INFO: Received HTTP response from the server, response code=200

---->Remove shared data success.


Give The Command to remove a specific file. This command will remove the file: /apps/Test/SOAPService.wsdl'

deleteMetadata(application='soa-infra',server='soa_server1',docs='/apps/Test/SOAPService.wsdl')

Wednesday, February 1, 2017

Salesforce: Generate Enterprise WSDL

To generate the metadata and enterprise WSDL files for your organization:
  1. Log in to your Salesforce account. You must log in as an administrator or as a user who has the “Modify All Data” permission.
  2. From Setup, enter API in the Quick Find box, then select API
  3. Click Generate Enterprise WSDL and save the XML WSDL file to your file system.


Amazon Bedrock and AWS Rekognition comparison for Image Recognition

 Both Amazon Bedrock and AWS Rekognition are services provided by AWS, but they cater to different use cases, especially when it comes to ...